Epson FX 1170 User Manual - Page 96
Using Two Tractor Units in Combination
 |
View all Epson FX 1170 manuals
Add to My Manuals
Save this manual to your list of manuals |
Page 96 highlights
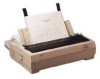
Additional Tractor Unit Using two tractor units in combination 1. Install one tractor in the front or rear-tractor position. See Chapter 2 for details. 2. Place the continuous paper on the sprocket units of the front or rear-push tractor unit. See Using continuous paper in Chapter 2. 3. Reinstall the paper guide. 4. Install the other tractor in the pull tractor position. See Chapter 2 for details. 5. Turn on the printer. Press the PAPER FEED button to load paper; then press the PAPER FEED button again to advance the paper. CAUTION: Always turn off the printer before you use the knob on its left side to clear paper jams. If the printer is on, you may damage it or lose the top-of-form position. 6. Release the sprocket lock levers of the pull tractor and adjust the sprocket units to match the width of the paper. Be sure the sprocket units on both tractors are aligned so the paper is not crooked. 7. Fit the holes of the paper over the tractor pins of the sprocket unit and adjust the sprocket units as necessary. See Using Continuous Paper in Chapter 2. 8. Close the sprocket covers. 4-14 Using the Printer Options
-
 1
1 -
2
-
3
-
4
-
5
-
6
-
7
-
8
-
9
-
10
-
11
-
12
-
13
-
14
-
15
-
16
-
17
-
18
-
19
-
20
-
21
-
22
-
23
-
24
-
25
-
26
-
27
-
28
-
29
-
30
-
31
-
32
-
33
-
34
-
35
-
36
-
37
-
38
-
39
-
40
-
41
-
42
-
43
-
44
-
45
-
46
-
47
-
48
-
49
-
50
-
51
-
52
-
53
-
54
-
55
-
56
-
57
-
58
-
59
-
60
-
61
-
62
-
63
-
64
-
65
-
66
-
67
-
68
-
69
-
70
-
71
-
72
-
73
-
74
-
75
-
76
-
77
-
78
-
79
-
80
-
81
-
82
-
83
-
84
-
85
-
86
-
87
-
88
-
89
-
90
-
 91
91 -
 92
92 -
 93
93 -
 94
94 -
 95
95 -
 96
96 -
 97
97 -
 98
98 -
 99
99 -
 100
100 -
 101
101 -
102
-
103
-
104
-
105
-
106
-
107
-
108
-
109
-
110
-
111
-
112
-
113
-
114
-
115
-
116
-
117
-
118
-
119
-
120
-
121
-
122
-
123
-
124
-
125
-
126
-
127
-
128
-
129
-
130
-
131
-
132
-
133
-
134
-
135
-
136
-
137
-
138
-
139
-
140
-
141
-
142
-
143
-
144
-
145
-
146
-
147
-
148
-
149
-
150
-
151
-
152
-
153
-
154
-
155
-
156
-
157
-
158
-
159
-
160
-
161
-
162
-
163
-
164
-
165
-
166
-
167
-
168
-
169
-
170
-
171
-
172
-
173
-
174
-
175
-
176
-
177
-
178
-
179
-
180
-
181
-
182
-
183
-
184
 |
 |
