Epson FX 1170 User Manual - Page 42
Paper Handling 2-9, To remove the tractor unit, press the tractor's lock tabs, tilt the unit
 |
View all Epson FX 1170 manuals
Add to My Manuals
Save this manual to your list of manuals |
Page 42 highlights
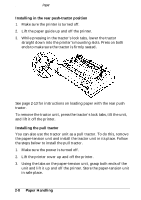
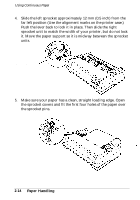
Using Continuous Paper 4. An arrow on each side of the mounting slots shows you where to install the tractor. Lower it straight down into the slots as shown. Then push it back in the direction of the arrow in the illustration. See page 2-16 for instructions on loading paper with the pull tractor. To remove the tractor unit, press the tractor's lock tabs, tilt the unit toward you, and lift it off the printer. Then replace the paper-tension unit. Paper Handling 2-9
-
 1
1 -
2
-
3
-
4
-
5
-
6
-
7
-
8
-
9
-
10
-
11
-
12
-
13
-
14
-
15
-
16
-
17
-
18
-
19
-
20
-
21
-
22
-
23
-
24
-
25
-
26
-
27
-
28
-
29
-
30
-
31
-
32
-
33
-
34
-
35
-
36
-
 37
37 -
 38
38 -
 39
39 -
 40
40 -
 41
41 -
 42
42 -
 43
43 -
 44
44 -
 45
45 -
 46
46 -
 47
47 -
48
-
49
-
50
-
51
-
52
-
53
-
54
-
55
-
56
-
57
-
58
-
59
-
60
-
61
-
62
-
63
-
64
-
65
-
66
-
67
-
68
-
69
-
70
-
71
-
72
-
73
-
74
-
75
-
76
-
77
-
78
-
79
-
80
-
81
-
82
-
83
-
84
-
85
-
86
-
87
-
88
-
89
-
90
-
91
-
92
-
93
-
94
-
95
-
96
-
97
-
98
-
99
-
100
-
101
-
102
-
103
-
104
-
105
-
106
-
107
-
108
-
109
-
110
-
111
-
112
-
113
-
114
-
115
-
116
-
117
-
118
-
119
-
120
-
121
-
122
-
123
-
124
-
125
-
126
-
127
-
128
-
129
-
130
-
131
-
132
-
133
-
134
-
135
-
136
-
137
-
138
-
139
-
140
-
141
-
142
-
143
-
144
-
145
-
146
-
147
-
148
-
149
-
150
-
151
-
152
-
153
-
154
-
155
-
156
-
157
-
158
-
159
-
160
-
161
-
162
-
163
-
164
-
165
-
166
-
167
-
168
-
169
-
170
-
171
-
172
-
173
-
174
-
175
-
176
-
177
-
178
-
179
-
180
-
181
-
182
-
183
-
184
 |
 |

Using Continuous Paper
4.
An arrow on each side of the mounting slots shows you where to
install the tractor. Lower it straight down into the slots as shown.
Then push it back in the direction of the arrow in the illustration.
See page 2-16 for instructions on loading paper with the pull tractor.
To remove the tractor unit, press the tractor’s lock tabs, tilt the unit
toward you, and lift it off the printer. Then replace the paper-tension
unit.
Paper Handling 2-9