Epson PowerLite 9300i User's Guide - Page 24
Connecting an RGB Video Source, Connecting Using a VGA Computer Cable
 |
View all Epson PowerLite 9300i manuals
Add to My Manuals
Save this manual to your list of manuals |
Page 24 highlights
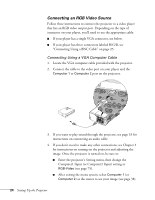
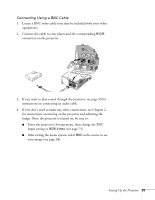
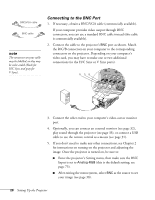
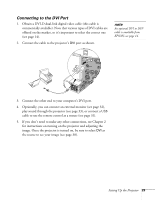
Connecting an RGB Video Source Follow these instructions to connect the projector to a video player that has an RGB video output port. Depending on the type of connector on your player, you'll need to use the appropriate cable: ■ If your player has a single VGA connector, see below. ■ If your player has three connectors labeled R/G/B, see "Connecting Using a BNC Cable" on page 25. Connecting Using a VGA Computer Cable 1. Locate the VGA computer cable provided with the projector. 2. Connect the cable to the video port on your player and the Computer 1 or Computer 2 port on the projector. 3. If you want to play sound through the projector, see page 33 for instructions on connecting an audio cable. 4. If you don't need to make any other connections, see Chapter 2 for instructions on turning on the projector and adjusting the image. Once the projector is turned on, be sure to: ■ Enter the projector's Setting menu, then change the Computer1 Input (or Computer2 Input) setting to RGB-Video (see page 75). ■ After exiting the menu system, select Computer 1 (or Computer 2) as the source to see your image (see page 38). 24 Setting Up the Projector
-
 1
1 -
2
-
3
-
4
-
5
-
6
-
7
-
8
-
9
-
10
-
11
-
12
-
13
-
14
-
15
-
16
-
17
-
18
-
 19
19 -
 20
20 -
 21
21 -
 22
22 -
 23
23 -
 24
24 -
 25
25 -
 26
26 -
 27
27 -
 28
28 -
 29
29 -
30
-
31
-
32
-
33
-
34
-
35
-
36
-
37
-
38
-
39
-
40
-
41
-
42
-
43
-
44
-
45
-
46
-
47
-
48
-
49
-
50
-
51
-
52
-
53
-
54
-
55
-
56
-
57
-
58
-
59
-
60
-
61
-
62
-
63
-
64
-
65
-
66
-
67
-
68
-
69
-
70
-
71
-
72
-
73
-
74
-
75
-
76
-
77
-
78
-
79
-
80
-
81
-
82
-
83
-
84
-
85
-
86
-
87
-
88
-
89
-
90
-
91
-
92
-
93
-
94
-
95
-
96
-
97
-
98
-
99
-
100
-
101
-
102
-
103
-
104
-
105
-
106
-
107
-
108
-
109
-
110
-
111
-
112
-
113
-
114
-
115
-
116
-
117
-
118
-
119
-
120
-
121
-
122
-
123
-
124
-
125
-
126
-
127
-
128
-
129
-
130
-
131
-
132
-
133
-
134
-
135
-
136
-
137
-
138
-
139
-
140
-
141
-
142
 |
 |
