GE E1250TW User Manual (English) - Page 45
Manual
 |
UPC - 810027012500
View all GE E1250TW manuals
Add to My Manuals
Save this manual to your list of manuals |
Page 45 highlights
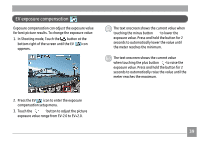
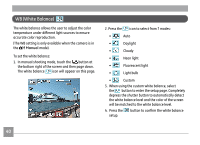
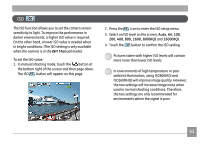
ISO The ISO function allows you to set the camera sensor sensitivity to light. To improve the performance in darker environments, a higher ISO value is required. On the other hand, a lower ISO value is needed when in bright conditions. (The ISO setting is only available when the camera is in the Manual mode). To set the ISO value: 1. In manual shooting mode, touch the button at the bottom right of the screen and then page down. The ISO button will appear on this page. 2. Press the icon to enter the ISO setup menu. 3. Select an ISO level on the screen, Auto, 64, 100, 200, 400, 800, 1600, 800(HQ) and 1600(HQ). 4. Touch the button to confirm the ISO setting. Pictures taken with higher ISO levels will contain more noise than lower ISO levels. In environments of high temperature or poor ambient illumination, using ISO800(HQ) and ISO1600(HQ) will improve image quality. However, the two settings will increase image noise when used in normal shooting conditions. Therefore, the two settings are only recommended for environments where the signal is poor 41
-
 1
1 -
2
-
3
-
4
-
5
-
6
-
7
-
8
-
9
-
10
-
11
-
12
-
13
-
14
-
15
-
16
-
17
-
18
-
19
-
20
-
21
-
22
-
23
-
24
-
25
-
26
-
27
-
28
-
29
-
30
-
31
-
32
-
33
-
34
-
35
-
36
-
37
-
38
-
39
-
 40
40 -
 41
41 -
 42
42 -
 43
43 -
 44
44 -
 45
45 -
 46
46 -
 47
47 -
 48
48 -
 49
49 -
 50
50 -
51
-
52
-
53
-
54
-
55
-
56
-
57
-
58
-
59
-
60
-
61
-
62
-
63
-
64
-
65
-
66
-
67
-
68
-
69
-
70
-
71
-
72
-
73
-
74
-
75
-
76
-
77
-
78
-
79
-
80
-
81
-
82
-
83
-
84
-
85
-
86
-
87
-
88
-
89
-
90
-
91
-
92
-
93
-
94
-
95
-
96
-
97
-
98
 |
 |