HP 4400C HP Scanjet 4400C/5400C Series Scanner Windows - (English) User Manual - Page 22
Zoom In, Zoom Out, Resize, Tools, Editable Text, Text & Image, Scan
 |
UPC - 725184800566
View all HP 4400C manuals
Add to My Manuals
Save this manual to your list of manuals |
Page 22 highlights
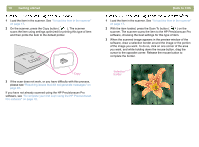
Back to TOC To reduce file size: l Save files using a compressed format, such as TIFF compressed or JPEG. l Avoid using the True Color output type unless necessary. This output type offers exceptional quality for color photos or drawings, but it also creates large file sizes. l Set the resolution no higher than necessary. Generally, the resolution the software automatically sets provides the best balance between image quality and small file size. l For photos, significantly reduce file size by cropping the photo to select just one area as the final scanned image. Or, resize the entire photo to smaller dimensions. The HP Precisionscan Pro software sets the resolution for you based on the original document attributes. In almost all cases, you get the best results and the smallest file size using the default resolution. A computer screen usually displays images at 72 to 75 pixels per inch (PPI). Print resolution is usually higher. Screens also use fewer colors to display an image. Even if an image looks incorrect on the screen, it might print the way you want. Getting started 21 Use Zoom In to view an area of the scanned image close up. Use Zoom Out to return to the original view of the image. The zoom commands do not change the final size of your scan; they just give you a different view on a monitor. To reduce or enlarge the size of the final scan, use the Resize command on the Tools menu. When you scan an item containing text, you can use the text either as a scanned image, such as a fax or image archive, or as text you can edit. To have the optical character recognition (OCR) software make the text editable automatically and send the text to a supported wordprocessing program, press the Scan To button ( ). In the HP Precisionscan Pro software, use the output type of Editable Text (OCR) or Text & Image. Then, on the Scan menu, click Scan To, choose your word-processing program, and click Scan. Tip Perform a spell-check after you have successfully scanned your text to a word-processing program.
-
 1
1 -
2
-
3
-
4
-
5
-
6
-
7
-
8
-
9
-
10
-
11
-
12
-
13
-
14
-
15
-
16
-
 17
17 -
 18
18 -
 19
19 -
 20
20 -
 21
21 -
 22
22 -
 23
23 -
 24
24 -
 25
25 -
 26
26 -
 27
27 -
28
-
29
-
30
-
31
-
32
-
33
-
34
-
35
-
36
-
37
-
38
-
39
-
40
-
41
-
42
-
43
-
44
-
45
-
46
-
47
-
48
-
49
-
50
-
51
-
52
-
53
-
54
-
55
-
56
-
57
-
58
-
59
-
60
-
61
-
62
-
63
-
64
-
65
-
66
-
67
-
68
-
69
-
70
-
71
-
72
-
73
-
74
-
75
-
76
-
77
-
78
-
79
-
80
-
81
-
82
-
83
-
84
-
85
-
86
-
87
-
88
-
89
-
90
-
91
-
92
-
93
-
94
-
95
-
96
-
97
-
98
-
99
-
100
-
101
-
102
-
103
-
104
-
105
-
106
-
107
-
108
-
109
-
110
-
111
-
112
-
113
-
114
-
115
-
116
-
117
-
118
-
119
-
120
-
121
-
122
-
123
-
124
-
125
-
126
-
127
-
128
-
129
-
130
-
131
-
132
-
133
-
134
-
135
-
136
-
137
-
138
-
139
-
140
-
141
 |
 |