HP 4400C HP Scanjet 4400C/5400C Series Scanner Windows - (English) User Manual - Page 82
Making optional adjustments for slides or negatives, Adjusting midtones for slides or negatives
 |
UPC - 725184800566
View all HP 4400C manuals
Add to My Manuals
Save this manual to your list of manuals |
Page 82 highlights
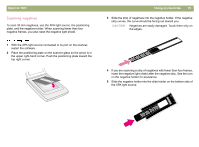
Back to TOC Making optional adjustments for slides or negatives You can make optional adjustments to slides or negatives scanned using the XPA. Before deciding to make adjustments, create a selection area around one slide or negative so the software exposes it correctly. See "Cropping or selecting an area for final scan" on page 42. If you choose to make adjustments to the image after you create a selection area, make most of them as you normally would, except for the following adjustments: l Midtone. See "Adjusting midtones for slides or negatives" on page 81. l Highlight. See "Adjusting highlights for slides or negatives" on page 82. l Shadow. See "Adjusting shadows for slides or negatives" on page 82. l RGB values and pixel color. See "Viewing RGB values and pixel color" on page 83. Tip See "Making optional adjustments, basic" on page 45 and "Making optional adjustments, advanced" on page 49 to make all adjustments except the ones mentioned above. Tip To enlarge a slide or negative, see "Resizing (output dimensions)" on page 45. Using accessories 81 Adjusting midtones for slides or negatives You can adjust the overall lightness or darkness of the scanned image using the midtone setting. The range for the number in the Midtone field is -100 to 100. 1 On the Advanced menu, click Adjust Exposure. 2 Do one of the following: l Drag the Midtone slider to the right. l Type a higher number in the Midtone field and press ENTER. 1 On the Advanced menu, click Adjust Exposure. 2 Do one of the following: l Drag the Midtone slider to the left. l Type a lower number in the Midtone field and press ENTER. 1 On the Advanced menu, click Adjust Exposure. 2 Click Auto to return the midtone, highlight, and shadow settings to the defaults for this slide or negative.
-
 1
1 -
2
-
3
-
4
-
5
-
6
-
7
-
8
-
9
-
10
-
11
-
12
-
13
-
14
-
15
-
16
-
17
-
18
-
19
-
20
-
21
-
22
-
23
-
24
-
25
-
26
-
27
-
28
-
29
-
30
-
31
-
32
-
33
-
34
-
35
-
36
-
37
-
38
-
39
-
40
-
41
-
42
-
43
-
44
-
45
-
46
-
47
-
48
-
49
-
50
-
51
-
52
-
53
-
54
-
55
-
56
-
57
-
58
-
59
-
60
-
61
-
62
-
63
-
64
-
65
-
66
-
67
-
68
-
69
-
70
-
71
-
72
-
73
-
74
-
75
-
76
-
 77
77 -
 78
78 -
 79
79 -
 80
80 -
 81
81 -
 82
82 -
 83
83 -
 84
84 -
 85
85 -
 86
86 -
 87
87 -
88
-
89
-
90
-
91
-
92
-
93
-
94
-
95
-
96
-
97
-
98
-
99
-
100
-
101
-
102
-
103
-
104
-
105
-
106
-
107
-
108
-
109
-
110
-
111
-
112
-
113
-
114
-
115
-
116
-
117
-
118
-
119
-
120
-
121
-
122
-
123
-
124
-
125
-
126
-
127
-
128
-
129
-
130
-
131
-
132
-
133
-
134
-
135
-
136
-
137
-
138
-
139
-
140
-
141
 |
 |
