HP 7660 HP Photosmart 7600 series - (English) Basics Guide - Page 31
print a proof sheet
 |
UPC - 844844844303
View all HP 7660 manuals
Add to My Manuals
Save this manual to your list of manuals |
Page 31 highlights
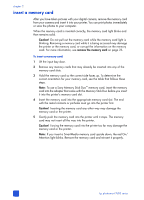
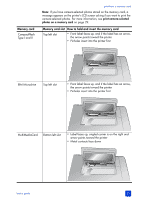
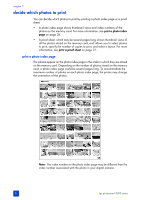
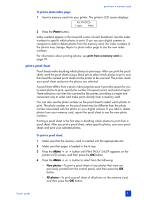
print from a memory card To print a photo index page: 1 Insert a memory card into your printer. The printer's LCD screen displays: ALL PHOTOS 1 copy Index 2 Press the PRINT button. Index numbers appear in the lower-left corner of each thumbnail. Use the index numbers to specify which photos to print. If you use your digital camera or computer to add or delete photos from the memory card, the index numbers of the photos may change. Reprint a photo index page to see the new index numbers. For information about printing photos, see print from a memory card on page 29. print a proof sheet Proof sheets make deciding which photos to print easy. After you print the proof sheet, mark the proof sheet using a black pen to select which photos to print, and then feed the marked proof sheet into the printer to be scanned. The printer reads your proof sheet and prints the photos you selected. A proof sheet differs from a photo index page because it provides spaces for you to select photos to print, specify the number of copies to print, and select a layout. These selections can then be scanned by the printer, providing a simple and convenient way to order and make prints directly from a memory card. You can also use the photo number on the proof sheet to select which photos to print. The photo number on the proof sheet may be different than the photo number associated with the photo on your digital camera. If you add or delete photos from your memory card, reprint the proof sheet to see the new photo numbers. Printing a proof sheet is the first step in deciding which photos to print from a proof sheet. After you print a proof sheet, select specific photos, scan your proof sheet, and print your selected photos. To print a proof sheet: 1 Make sure that the memory card is inserted into the appropriate slot. 2 Make sure that paper is loaded in the In tray. 3 Press the MENU or button until PRINT PROOF SHEET? appears on the printer's LCD screen, and then press the OK button. 4 Press the MENU or button to select from the following: - New photos-To print a proof sheet of any photos that were not previously printed from the control panel, and then press the OK button. - All photos-To print a proof sheet of all photos on the memory card, and then press the OK button. basics guide 27
-
 1
1 -
2
-
3
-
4
-
5
-
6
-
7
-
8
-
9
-
10
-
11
-
12
-
13
-
14
-
15
-
16
-
17
-
18
-
19
-
20
-
21
-
22
-
23
-
24
-
25
-
 26
26 -
 27
27 -
 28
28 -
 29
29 -
 30
30 -
 31
31 -
 32
32 -
 33
33 -
 34
34 -
 35
35 -
 36
36 -
37
-
38
-
39
-
40
-
41
-
42
-
43
-
44
-
45
-
46
-
47
-
48
-
49
-
50
-
51
-
52
-
53
-
54
-
55
-
56
-
57
-
58
-
59
-
60
-
61
-
62
-
63
-
64
 |
 |