HP 7660 HP Photosmart 7600 series - (English) Basics Guide - Page 47
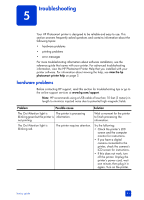
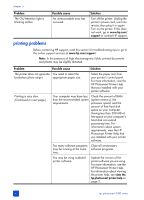
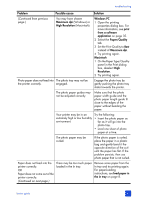
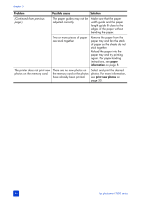
Problem, Possible cause, Solution
 |
UPC - 844844844303
View all HP 7660 manuals
Add to My Manuals
Save this manual to your list of manuals |
Page 47 highlights
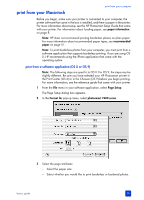
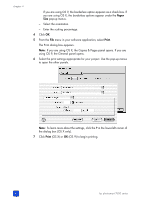
troubleshooting Problem Possible cause Solution (Continued from previous page.) You may have chosen Maximum dpi (Windows) or High Resolution (Macintosh). Windows PC 1 Open the printing properties dialog box. For more information, see print from a software application on page 35. 2 Select the Paper/Quality tab. 3 Set the Print Quality to Best instead of Maximum dpi. 4 Try printing again. Macintosh 1 On the Paper Type/Quality panel in the Print dialog box, deselect High Resolution. 2 Try printing again. Photo paper does not feed into The photo tray may not be the printer correctly. engaged. Engage the photo tray by gently pushing the photo tray slider towards the printer. The photo paper guides may not be adjusted correctly. Make sure that the photo paper width guide and the photo paper length guide fit close to the edges of the paper without bending the paper. Your printer may be in an extremely high or low humidity environment. Try the following: • Insert the photo paper as far as it will go into the photo tray. • Load one sheet of photo paper at a time. The photo paper may be curled. If the photo paper is curled, place the paper in a plastic bag and gently bend it the opposite direction of the curl until the paper lies flat. If the problem persists, then use photo paper that is not curled. Paper does not feed into the printer correctly. OR Paper does not come out of the printer correctly. (Continued on next page.) There may be too much paper loaded in the In tray. Remove some paper from the In tray and try printing again. For paper-loading instructions, see load paper in the in tray on page 8. basics guide 43
-
 1
1 -
2
-
3
-
4
-
5
-
6
-
7
-
8
-
9
-
10
-
11
-
12
-
13
-
14
-
15
-
16
-
17
-
18
-
19
-
20
-
21
-
22
-
23
-
24
-
25
-
26
-
27
-
28
-
29
-
30
-
31
-
32
-
33
-
34
-
35
-
36
-
37
-
38
-
39
-
40
-
41
-
 42
42 -
 43
43 -
 44
44 -
 45
45 -
 46
46 -
 47
47 -
 48
48 -
 49
49 -
 50
50 -
 51
51 -
 52
52 -
53
-
54
-
55
-
56
-
57
-
58
-
59
-
60
-
61
-
62
-
63
-
64
 |
 |
