HP Cisco MDS 9020 Cisco MDS 9500 Series Hardware Installation Guide (OL-17467- - Page 123
Closing the Ejector Levers, auto-sync
 |
View all HP Cisco MDS 9020 manuals
Add to My Manuals
Save this manual to your list of manuals |
Page 123 highlights
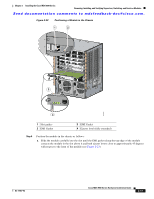
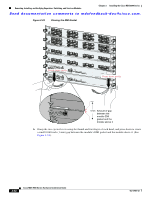
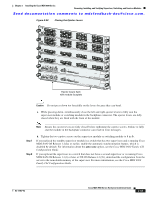
Chapter 2 Installing the Cisco MDS 9500 Series Removing, Installing, and Verifying Supervisor, Switching, and Services Modules Send documentation comments to [email protected]. Figure 2-24 Closing the Ejector Levers 99331 Ejector levers flush with module faceplate Caution Do not press down too forcefully on the levers because they can bend. c. While pressing down, simultaneously close the left and right ejector levers to fully seat the supervisor module or switching module in the backplane connector. The ejector levers are fully closed when they are flush with the front of the module. Note Ensure the ejector levers are fully closed before tightening the captive screws. Failure to fully seat the module in the backplane connector can result in error messages. Step 7 Step 8 d. Tighten the two captive screws on the supervisor module or switching module to 8 in-lb. If you replaced the standby supervisor module in a switch that has two supervisors and is running Cisco MDS SAN-OS Release 1.2(2a) or earlier, enable the automatic synchronization feature, which is disabled by default. For information about the auto-sync option, see the Cisco MDS 9000 Family CLI Configuration Guide. If you replaced the supervisor in a switch that does not have a second supervisor or is running Cisco MDS SAN-OS Release 1.3(1) or later or NX-OS Release 4.1(1b), download the configuration from the server to the nonvolatile memory of the supervisor. For more information, see the Cisco MDS 9000 Family CLI Configuration Guide. OL-17467-02 Cisco MDS 9500 Series Hardware Installation Guide 2-43
-
 1
1 -
2
-
3
-
4
-
5
-
6
-
7
-
8
-
9
-
10
-
11
-
12
-
13
-
14
-
15
-
16
-
17
-
18
-
19
-
20
-
21
-
22
-
23
-
24
-
25
-
26
-
27
-
28
-
29
-
30
-
31
-
32
-
33
-
34
-
35
-
36
-
37
-
38
-
39
-
40
-
41
-
42
-
43
-
44
-
45
-
46
-
47
-
48
-
49
-
50
-
51
-
52
-
53
-
54
-
55
-
56
-
57
-
58
-
59
-
60
-
61
-
62
-
63
-
64
-
65
-
66
-
67
-
68
-
69
-
70
-
71
-
72
-
73
-
74
-
75
-
76
-
77
-
78
-
79
-
80
-
81
-
82
-
83
-
84
-
85
-
86
-
87
-
88
-
89
-
90
-
91
-
92
-
93
-
94
-
95
-
96
-
97
-
98
-
99
-
100
-
101
-
102
-
103
-
104
-
105
-
106
-
107
-
108
-
109
-
110
-
111
-
112
-
113
-
114
-
115
-
116
-
117
-
 118
118 -
 119
119 -
 120
120 -
 121
121 -
 122
122 -
 123
123 -
 124
124 -
 125
125 -
 126
126 -
 127
127 -
 128
128 -
129
-
130
-
131
-
132
-
133
-
134
-
135
-
136
-
137
-
138
-
139
-
140
-
141
-
142
-
143
-
144
-
145
-
146
-
147
-
148
-
149
-
150
-
151
-
152
-
153
-
154
-
155
-
156
-
157
-
158
-
159
-
160
-
161
-
162
-
163
-
164
-
165
-
166
-
167
-
168
-
169
-
170
-
171
-
172
-
173
-
174
-
175
-
176
-
177
-
178
-
179
-
180
-
181
-
182
-
183
-
184
-
185
-
186
-
187
-
188
-
189
-
190
-
191
-
192
-
193
-
194
-
195
-
196
-
197
-
198
-
199
-
200
-
201
-
202
-
203
-
204
-
205
-
206
-
207
-
208
-
209
-
210
-
211
-
212
-
213
-
214
-
215
-
216
-
217
-
218
-
219
-
220
-
221
-
222
-
223
-
224
-
225
-
226
-
227
-
228
-
229
-
230
-
231
-
232
-
233
-
234
-
235
-
236
-
237
-
238
-
239
-
240
-
241
-
242
-
243
-
244
-
245
-
246
-
247
-
248
-
249
-
250
-
251
-
252
-
253
-
254
-
255
-
256
-
257
-
258
-
259
-
260
-
261
-
262
-
263
-
264
-
265
-
266
-
267
-
268
-
269
-
270
-
271
-
272
-
273
-
274
-
275
-
276
-
277
-
278
-
279
-
280
-
281
-
282
-
283
-
284
-
285
-
286
-
287
-
288
 |
 |
