HP Color LaserJet CM4730 HP Color LaserJet CM4730 MFP Embedded Web Server - Us - Page 98
Export an address book, Clear address books, To clear one or more address books, do the following
 |
View all HP Color LaserJet CM4730 manuals
Add to My Manuals
Save this manual to your list of manuals |
Page 98 highlights
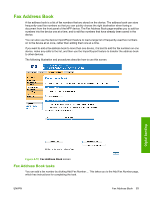
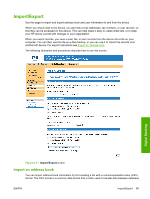
6. Click Finish to finish the wizard and export the file. 7. To import the .CSV file into the device, follow Steps 4 and 5 of the Import an address book instructions. Export an address book You can also export the address book or user information that has been saved in the device. This data is exported into a CSV file that has the same format as that described above, with one header row followed by a row for each user or address book record. To export data, do the following: 1. Select one or more of the check boxes shown under Step 1. 2. Under Step 2, type in the name for the export file. 3. In the dialog box that appears, click Save, and then select the location where you want to save the file. 4. If the export process fails, an error message will be displayed. If this happens, wait a few minutes and try the export again. You can open the export file in either a spreadsheet program like Microsoft Excel, or in a text program like Notepad. Clear address books By default, clicking the Clear Selected Address Book(s) button clears all address book data (e-mail, fax, and authorized user data) from the device. You can also specify individual address books to clear, although e-mail addresses and e-mail distribution lists may not be cleared separately. You might want to clear all address books before moving the device to a new area within your company, or before importing address book data from another device. To clear one or more address books, do the following: 1. Select one or more of the check boxes shown under Option 3: Clear Address Books. 2. Click Clear Selected Address Book(s) to erase the data in the selected address books. A warning dialog box appears, indicating which address books are selected for deletion. 3. Click OK to confirm this action. Once cleared, the data can not be recovered. 4. After OK is pressed, the address book data is cleared and you are returned to the original page. A list of the cleared address books is displayed. Digital Sending 88 Chapter 4 Setting the digital sending options ENWW
-
 1
1 -
2
-
3
-
4
-
5
-
6
-
7
-
8
-
9
-
10
-
11
-
12
-
13
-
14
-
15
-
16
-
17
-
18
-
19
-
20
-
21
-
22
-
23
-
24
-
25
-
26
-
27
-
28
-
29
-
30
-
31
-
32
-
33
-
34
-
35
-
36
-
37
-
38
-
39
-
40
-
41
-
42
-
43
-
44
-
45
-
46
-
47
-
48
-
49
-
50
-
51
-
52
-
53
-
54
-
55
-
56
-
57
-
58
-
59
-
60
-
61
-
62
-
63
-
64
-
65
-
66
-
67
-
68
-
69
-
70
-
71
-
72
-
73
-
74
-
75
-
76
-
77
-
78
-
79
-
80
-
81
-
82
-
83
-
84
-
85
-
86
-
87
-
88
-
89
-
90
-
91
-
92
-
 93
93 -
 94
94 -
 95
95 -
 96
96 -
 97
97 -
 98
98 -
 99
99 -
 100
100 -
 101
101 -
 102
102 -
 103
103 -
104
-
105
-
106
-
107
-
108
-
109
-
110
-
111
-
112
-
113
-
114
-
115
-
116
 |
 |