HP Mv2120 HP MV2120, MV5020, MV5140, MV5150 Media Vault - User's Guide - Page 13
Connecting the HP Media Vault, Powering
 |
UPC - 883585549856
View all HP Mv2120 manuals
Add to My Manuals
Save this manual to your list of manuals |
Page 13 highlights
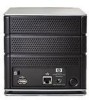
Connecting the HP Media Vault How you connect the HP Media Vault to your network depends on the network configuration. Figure 1: Connecting the HP Media Vault to the network This example shows a broadband router (1) connecting the following: • HP Media Vault (2) • Desktop PC (3) • Notebook computer with a wireless adapter (4) • Broadband Modem (5) The Media Vault uses a Dynamic Host Configuration Protocol (DHCP)enabled router to get its IP address. By default, most routers include a DHCP server. For more information, check your router documentation. Caution: If you have wireless functionality on your network, be sure to enable your router's security settings, such as Wi-Fi Protected Access (WPA) or Wired Equivalent Privacy (WEP), to protect your network. See the documentation that came with your router. Powering on Once the HP Media Vault is connected to the network, you are ready to power it on. 1-5
-
 1
1 -
2
-
3
-
4
-
5
-
6
-
7
-
 8
8 -
 9
9 -
 10
10 -
 11
11 -
 12
12 -
 13
13 -
 14
14 -
 15
15 -
 16
16 -
 17
17 -
 18
18 -
19
-
20
-
21
-
22
-
23
-
24
-
25
-
26
-
27
-
28
-
29
-
30
-
31
-
32
-
33
-
34
-
35
-
36
-
37
-
38
-
39
-
40
-
41
-
42
-
43
-
44
-
45
-
46
-
47
-
48
-
49
-
50
-
51
-
52
-
53
-
54
-
55
-
56
-
57
-
58
-
59
-
60
-
61
-
62
-
63
-
64
-
65
-
66
-
67
-
68
-
69
-
70
-
71
-
72
-
73
-
74
-
75
-
76
-
77
-
78
-
79
-
80
-
81
-
82
-
83
-
84
-
85
-
86
-
87
-
88
-
89
-
90
-
91
-
92
-
93
-
94
-
95
-
96
-
97
-
98
-
99
-
100
-
101
-
102
-
103
-
104
-
105
-
106
-
107
-
108
-
109
-
110
-
111
-
112
-
113
-
114
-
115
-
116
-
117
-
118
-
119
-
120
-
121
-
122
-
123
-
124
-
125
-
126
-
127
-
128
-
129
-
130
-
131
-
132
-
133
-
134
-
135
-
136
-
137
-
138
-
139
-
140
-
141
-
142
-
143
-
144
-
145
-
146
-
147
-
148
-
149
-
150
-
151
-
152
-
153
-
154
-
155
-
156
-
157
-
158
-
159
-
160
-
161
-
162
-
163
-
164
-
165
-
166
-
167
-
168
-
169
-
170
-
171
-
172
-
173
-
174
-
175
-
176
-
177
-
178
-
179
-
180
-
181
-
182
-
183
-
184
-
185
-
186
-
187
-
188
-
189
-
190
-
191
-
192
-
193
-
194
-
195
-
196
-
197
-
198
-
199
-
200
-
201
-
202
-
203
-
204
-
205
-
206
-
207
-
208
-
209
-
210
-
211
-
212
 |
 |
