HP P3410A HP NetRAID 1M/2M Installation & Configuration - Page 51
Install the Adapter
 |
UPC - 725184582783
View all HP P3410A manuals
Add to My Manuals
Save this manual to your list of manuals |
Page 51 highlights
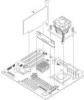
Chapter 5 Installation and Configuration CAUTION Before removing the cover, always disconnect the power cord(s) and unplug telephone cables. Disconnect the power cord to avoid exposure to high energy levels that may cause burns when parts are short-circuited by metal objects, such as tools or jewelry. Disconnect telephone cables to avoid exposure to shock hazard from telephone ringing voltages. Note that the power switch does not turn off standby power in some HP Netservers. Disconnect the power cord(s) to turn off standby power. 3. Open or remove the HP Netserver panels or covers over the PCI slots. 4. To remove an existing adapter, disconnect its SCSI cables first. Follow the procedures in Chapter 8, "Upgrading to an HP NetRAID-1M or HP NetRAID-2M Adapter," to remove the adapter and to disconnect the battery if it is an HP NetRAID-2M. Install the Adapter CAUTION Do not allow the adapter to contact any part of the HP Netserver other than the PCI slot during installation. Do not allow the Battery Backup Unit on HP NetRAID-2M adapters to contact any part of the HP Netserver during installation. Any such contact could cause a short in the battery pack and may damage other electrical components. To install the adapter: 1. Refer to Worksheet A that you filled out while reading Chapter 4, "Planning," for the slot selected for the adapter. If the adapter is already installed, verify that it is in the correct slot. 2. If there is a slot cover on the PCI slot, remove it. 43
-
 1
1 -
2
-
3
-
4
-
5
-
6
-
7
-
8
-
9
-
10
-
11
-
12
-
13
-
14
-
15
-
16
-
17
-
18
-
19
-
20
-
21
-
22
-
23
-
24
-
25
-
26
-
27
-
28
-
29
-
30
-
31
-
32
-
33
-
34
-
35
-
36
-
37
-
38
-
39
-
40
-
41
-
42
-
43
-
44
-
45
-
 46
46 -
 47
47 -
 48
48 -
 49
49 -
 50
50 -
 51
51 -
 52
52 -
 53
53 -
 54
54 -
 55
55 -
 56
56 -
57
-
58
-
59
-
60
-
61
-
62
-
63
-
64
-
65
-
66
-
67
-
68
-
69
-
70
-
71
-
72
-
73
-
74
-
75
-
76
-
77
-
78
-
79
-
80
-
81
-
82
-
83
-
84
-
85
-
86
-
87
-
88
-
89
-
90
-
91
-
92
-
93
-
94
-
95
-
96
-
97
-
98
-
99
-
100
-
101
-
102
-
103
-
104
-
105
-
106
-
107
-
108
-
109
-
110
-
111
-
112
-
113
-
114
-
115
-
116
-
117
-
118
-
119
-
120
-
121
-
122
-
123
-
124
-
125
-
126
-
127
-
128
-
129
-
130
-
131
-
132
-
133
-
134
-
135
-
136
-
137
-
138
-
139
-
140
-
141
-
142
-
143
-
144
-
145
-
146
-
147
-
148
-
149
-
150
-
151
-
152
-
153
-
154
-
155
-
156
-
157
-
158
-
159
-
160
-
161
-
162
-
163
-
164
-
165
-
166
-
167
-
168
-
169
-
170
-
171
-
172
-
173
-
174
-
175
-
176
-
177
-
178
-
179
-
180
-
181
-
182
-
183
 |
 |
