HP Pavilion zt1100 HP Pavilion Notebook PC ZE1000 Series - Reference Guide - Page 49
Using Battery Power
 |
View all HP Pavilion zt1100 manuals
Add to My Manuals
Save this manual to your list of manuals |
Page 49 highlights
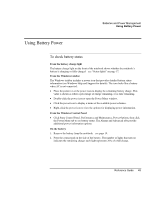
Batteries and Power Management Using Battery Power Using Battery Power To check battery status From the battery charge light The battery charge light on the front of the notebook shows whether the notebook's battery is charging or fully charged-see "Status lights" on page 17. From the Windows taskbar The Windows taskbar includes a power icon that provides detailed battery status information (see Windows Help and Support for details). The icon looks like a battery when AC is not connected. • Place the pointer over the power icon to display the remaining battery charge. This value is shown as either a percentage of charge remaining, or as time remaining. • Double-click the power icon to open the Power Meter window. • Click the power icon to display a menu of the available power schemes. • Right-click the power icon to view the options for displaying power information. From the Windows Control Panel • Click Start, Control Panel, Performance and Maintenance, Power Options, then click the Power Meter tab to see battery status. The Alarms and Advanced tabs provide additional power-information options. On the battery 1. Remove the battery from the notebook-see page 19. 2. Press the contact pad on the side of the battery. The number of lights that turn on indicates the remaining charge: each light represents 20% of a full charge. Reference Guide 49
-
 1
1 -
2
-
3
-
4
-
5
-
6
-
7
-
8
-
9
-
10
-
11
-
12
-
13
-
14
-
15
-
16
-
17
-
18
-
19
-
20
-
21
-
22
-
23
-
24
-
25
-
26
-
27
-
28
-
29
-
30
-
31
-
32
-
33
-
34
-
35
-
36
-
37
-
38
-
39
-
40
-
41
-
42
-
43
-
 44
44 -
 45
45 -
 46
46 -
 47
47 -
 48
48 -
 49
49 -
 50
50 -
 51
51 -
 52
52 -
 53
53 -
 54
54 -
55
-
56
-
57
-
58
-
59
-
60
-
61
-
62
-
63
-
64
-
65
-
66
-
67
-
68
-
69
-
70
-
71
-
72
-
73
-
74
-
75
-
76
-
77
-
78
-
79
-
80
-
81
-
82
-
83
-
84
-
85
-
86
-
87
-
88
-
89
-
90
-
91
-
92
-
93
-
94
-
95
-
96
-
97
-
98
-
99
-
100
-
101
-
102
-
103
-
104
-
105
-
106
-
107
-
108
-
109
-
110
-
111
-
112
-
113
-
114
-
115
-
116
-
117
-
118
-
119
-
120
-
121
-
122
-
123
-
124
-
125
-
126
-
127
-
128
-
129
 |
 |