HP Photosmart 3200 User Guide - Page 10
Control panel overview, HP Photosmart 3200 All-in-One series control panel features, Label - software
 |
View all HP Photosmart 3200 manuals
Add to My Manuals
Save this manual to your list of manuals |
Page 10 highlights
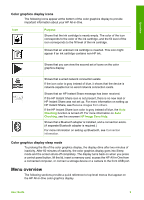
Overview (continued) Label 21 22 23 Description Rear clean-out door latch Rear clean-out door Power connection Control panel overview This section describes the functions of the control panel buttons, lights, and keypad, as well as the color graphics display icons and screen saver. HP Photosmart 3200 All-in-One series control panel features Label 1 2 3 4 5 6 7 Name and Description On: Turn the HP All-in-One on or off. When the HP All-in-One is off, a minimal amount of power is still supplied to the device. Film: Presents or removes the Film Menu for selecting options. Scan slides and negatives using the Slide and Negative holder and the Slide and Negative light in the lid of your HP All-in-One. Photo: Presents or removes the Photo Menu for selecting options. Select the photo function. When the button is lit, the photo function is selected. Use this button to set photo print options, edit photos, and transfer photos to a computer. HP Instant Share: Send or receive images directly from a network-connected HP All-in-One. If your HP All-in-One is USB-connected, you can send images using the HP Instant Share software on your computer. Proof Sheet: Print a proof sheet when a memory card or storage device has been inserted in the HP All-in-One. A proof sheet shows thumbnail views of all the photos on the memory card or storage device. You can select photos on the proof sheet, then print those photos by scanning the proof sheet. Color graphics display: View menus, photos, messages, and videos. Keypad: Enter numbers, values, or text, and navigate through menus. User Guide 7
-
 1
1 -
2
-
3
-
4
-
 5
5 -
 6
6 -
 7
7 -
 8
8 -
 9
9 -
 10
10 -
 11
11 -
 12
12 -
 13
13 -
 14
14 -
 15
15 -
16
-
17
-
18
-
19
-
20
-
21
-
22
-
23
-
24
-
25
-
26
-
27
-
28
-
29
-
30
-
31
-
32
-
33
-
34
-
35
-
36
-
37
-
38
-
39
-
40
-
41
-
42
-
43
-
44
-
45
-
46
-
47
-
48
-
49
-
50
-
51
-
52
-
53
-
54
-
55
-
56
-
57
-
58
-
59
-
60
-
61
-
62
-
63
-
64
-
65
-
66
-
67
-
68
-
69
-
70
-
71
-
72
-
73
-
74
-
75
-
76
-
77
-
78
-
79
-
80
-
81
-
82
-
83
-
84
-
85
-
86
-
87
-
88
-
89
-
90
-
91
-
92
-
93
-
94
-
95
-
96
-
97
-
98
-
99
-
100
-
101
-
102
-
103
-
104
-
105
-
106
-
107
-
108
-
109
-
110
-
111
-
112
-
113
-
114
-
115
-
116
-
117
-
118
-
119
-
120
-
121
-
122
-
123
-
124
-
125
-
126
-
127
-
128
-
129
-
130
-
131
-
132
-
133
-
134
-
135
-
136
-
137
-
138
-
139
-
140
-
141
-
142
-
143
-
144
 |
 |
