HP Photosmart 3200 User Guide - Page 9
Label, Description, Slide and Negative Film holder - scanning
 |
View all HP Photosmart 3200 manuals
Add to My Manuals
Save this manual to your list of manuals |
Page 9 highlights
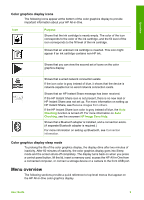
Overview Chapter 1 (continued) Label 3 4 5 6 7 8 9 10 11 12 13 14 15 16 17 Description Output tray Paper-width guide for the main tray Control panel: Use to access the HP All-in-One features. For more information about the buttons on the control panel, see HP Photosmart 3200 All-in-One series control panel features. Control panel lever: Press this lever to rotate the control panel up and down. Paper-length guide for the main tray Paper-width guide for the photo tray Paper-length guide for the photo tray Input trays: The HP All-in-One has two trays for paper and other types of media. The main tray is located on the bottom of the input tray and the photo tray is located on the top. Front USB port: Print photos directly from your camera or storage device. Memory card slots: Print photos directly from a memory card. Photo light: Indicates memory card or storage device access. Glass: Place a document on the glass to scan or copy. Slide and Negative Film light: This light makes it possible to scan transparent objects such as slides and negatives. Slide and Negative Film holder: Load 35 mm slides or negatives in this holder to scan them. Lid Label 18 19 20 Description Slide and Negative Film light power cord: This cord provides power to the light used to scan transparent objects such as slides and negatives. Ethernet port and Ethernet indicator lights: Connect to a wired network. Rear USB port 6 HP Photosmart 3200 All-in-One series
-
 1
1 -
2
-
3
-
 4
4 -
 5
5 -
 6
6 -
 7
7 -
 8
8 -
 9
9 -
 10
10 -
 11
11 -
 12
12 -
 13
13 -
 14
14 -
15
-
16
-
17
-
18
-
19
-
20
-
21
-
22
-
23
-
24
-
25
-
26
-
27
-
28
-
29
-
30
-
31
-
32
-
33
-
34
-
35
-
36
-
37
-
38
-
39
-
40
-
41
-
42
-
43
-
44
-
45
-
46
-
47
-
48
-
49
-
50
-
51
-
52
-
53
-
54
-
55
-
56
-
57
-
58
-
59
-
60
-
61
-
62
-
63
-
64
-
65
-
66
-
67
-
68
-
69
-
70
-
71
-
72
-
73
-
74
-
75
-
76
-
77
-
78
-
79
-
80
-
81
-
82
-
83
-
84
-
85
-
86
-
87
-
88
-
89
-
90
-
91
-
92
-
93
-
94
-
95
-
96
-
97
-
98
-
99
-
100
-
101
-
102
-
103
-
104
-
105
-
106
-
107
-
108
-
109
-
110
-
111
-
112
-
113
-
114
-
115
-
116
-
117
-
118
-
119
-
120
-
121
-
122
-
123
-
124
-
125
-
126
-
127
-
128
-
129
-
130
-
131
-
132
-
133
-
134
-
135
-
136
-
137
-
138
-
139
-
140
-
141
-
142
-
143
-
144
 |
 |
