HP Photosmart 3200 User Guide - Page 103
Self-maintenance sounds, Caution
 |
View all HP Photosmart 3200 manuals
Add to My Manuals
Save this manual to your list of manuals |
Page 103 highlights
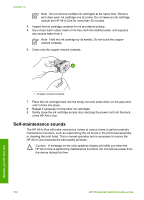
Chapter 12 Note Do not remove multiple ink cartridges at the same time. Remove and clean each ink cartridge one at a time. Do not leave an ink cartridge outside the HP All-in-One for more than 30 minutes. 4. Inspect the ink cartridge contacts for ink and debris buildup. 5. Dip a clean foam rubber swab or lint-free cloth into distilled water, and squeeze any excess water from it. Note Hold the ink cartridge by its handle. Do not touch the coppercolored contacts. 6. Clean only the copper-colored contacts. 1 Copper-colored contacts 7. Place the ink cartridge back into the empty slot and press down on the gray latch until it clicks into place. 8. Repeat if necessary for the other ink cartridges. 9. Gently close the ink cartridge access door and plug the power cord into the back of the HP All-in-One. Self-maintenance sounds The HP All-in-One will make mechanical noises at various times to perform periodic maintenance functions, such as replenishing the ink levels in the print head assembly or cleaning the print head. This is normal operation and is necessary to ensure the HP All-in-One produces the best quality printouts. Caution A message on the color graphics display will notify you when the HP All-in-One is performing maintenance functions. Do not remove power from the device during this time. 100 HP Photosmart 3200 All-in-One series Maintain your HP All-in-One
-
 1
1 -
2
-
3
-
4
-
5
-
6
-
7
-
8
-
9
-
10
-
11
-
12
-
13
-
14
-
15
-
16
-
17
-
18
-
19
-
20
-
21
-
22
-
23
-
24
-
25
-
26
-
27
-
28
-
29
-
30
-
31
-
32
-
33
-
34
-
35
-
36
-
37
-
38
-
39
-
40
-
41
-
42
-
43
-
44
-
45
-
46
-
47
-
48
-
49
-
50
-
51
-
52
-
53
-
54
-
55
-
56
-
57
-
58
-
59
-
60
-
61
-
62
-
63
-
64
-
65
-
66
-
67
-
68
-
69
-
70
-
71
-
72
-
73
-
74
-
75
-
76
-
77
-
78
-
79
-
80
-
81
-
82
-
83
-
84
-
85
-
86
-
87
-
88
-
89
-
90
-
91
-
92
-
93
-
94
-
95
-
96
-
97
-
 98
98 -
 99
99 -
 100
100 -
 101
101 -
 102
102 -
 103
103 -
 104
104 -
 105
105 -
 106
106 -
 107
107 -
 108
108 -
109
-
110
-
111
-
112
-
113
-
114
-
115
-
116
-
117
-
118
-
119
-
120
-
121
-
122
-
123
-
124
-
125
-
126
-
127
-
128
-
129
-
130
-
131
-
132
-
133
-
134
-
135
-
136
-
137
-
138
-
139
-
140
-
141
-
142
-
143
-
144
 |
 |
