HP ProBook 4540s HP ProBook 4540s Notebook PC HP ProBook 4440s Notebook PC HP - Page 72
board components, For discrete models
 |
View all HP ProBook 4540s manuals
Add to My Manuals
Save this manual to your list of manuals |
Page 72 highlights
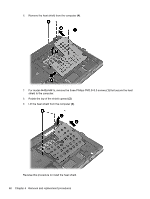
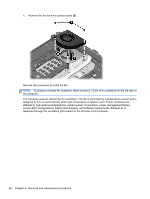
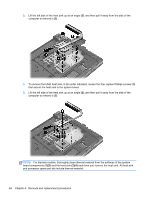
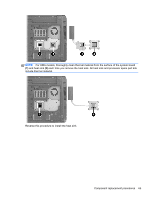
3. Lift the left side of the heat sink up at an angle (2), and then pull it away from the side of the computer to remove it (3). 4. To remove the UMA heat sink, in the order indicated, loosen the four captive Phillips screws (1) that secure the heat sink to the system board. 5. Lift the left side of the heat sink up at an angle (2), and then pull it away from the side of the computer to remove it (3). NOTE: For discrete models, thoroughly clean thermal material from the surfaces of the system board components (1)(3) and the heat sink (2)(4) each time you remove the heat sink. All heat sink and processor spare part kits include thermal material. 64 Chapter 4 Removal and replacement procedures
-
 1
1 -
2
-
3
-
4
-
5
-
6
-
7
-
8
-
9
-
10
-
11
-
12
-
13
-
14
-
15
-
16
-
17
-
18
-
19
-
20
-
21
-
22
-
23
-
24
-
25
-
26
-
27
-
28
-
29
-
30
-
31
-
32
-
33
-
34
-
35
-
36
-
37
-
38
-
39
-
40
-
41
-
42
-
43
-
44
-
45
-
46
-
47
-
48
-
49
-
50
-
51
-
52
-
53
-
54
-
55
-
56
-
57
-
58
-
59
-
60
-
61
-
62
-
63
-
64
-
65
-
66
-
 67
67 -
 68
68 -
 69
69 -
 70
70 -
 71
71 -
 72
72 -
 73
73 -
 74
74 -
 75
75 -
 76
76 -
 77
77 -
78
-
79
-
80
-
81
-
82
-
83
-
84
-
85
-
86
-
87
-
88
-
89
-
90
-
91
-
92
-
93
-
94
-
95
-
96
-
97
-
98
-
99
-
100
-
101
-
102
-
103
-
104
-
105
-
106
-
107
-
108
-
109
-
110
-
111
-
112
-
113
-
114
-
115
-
116
-
117
-
118
-
119
-
120
-
121
-
122
-
123
-
124
-
125
-
126
-
127
-
128
-
129
-
130
-
131
-
132
-
133
-
134
-
135
-
136
-
137
-
138
-
139
-
140
-
141
-
142
-
143
-
144
-
145
 |
 |

3.
Lift the left side of the heat sink up at an angle
(2)
, and then pull it away from the side of the
computer to remove it
(3)
.
4.
To remove the UMA heat sink, in the order indicated, loosen the four captive Phillips screws
(1)
that secure the heat sink to the system board.
5.
Lift the left side of the heat sink up at an angle
(2)
, and then pull it away from the side of the
computer to remove it
(3)
.
NOTE:
For discrete models, thoroughly clean thermal material from the surfaces of the system
board components
(1)(3)
and the heat sink
(2)(4)
each time you remove the heat sink. All heat sink
and processor spare part kits include thermal material.
64
Chapter 4
Removal and replacement procedures