HP ProLiant DL288 HP ProLiant DL288 G6 Server Software Configuration Guide - Page 5
Accessing the Setup Utility, Navigating through the Setup Utility
 |
View all HP ProLiant DL288 manuals
Add to My Manuals
Save this manual to your list of manuals |
Page 5 highlights
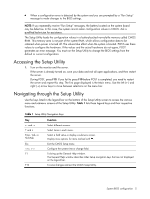
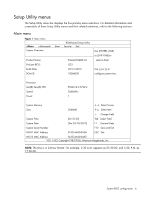
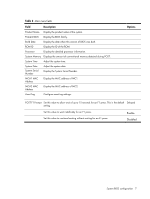
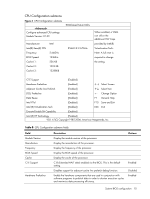
• When a configuration error is detected by the system and you are prompted by a "Run Setup" message to make changes to the BIOS settings. NOTE: If you repeatedly receive "Run Setup" messages, the battery located on the system board may be defective. In this case, the system cannot retain configuration values in CMOS. Ask a qualified technician for assistance. The Setup Utility loads the configuration values in a battery-backed nonvolatile memory called CMOS RAM. This memory area is not part of the system RAM, which allows configuration data to be retained when power is turned off. The values take effect when the system is booted. POST uses these values to configure the hardware. If the values and the actual hardware do not agree, POST generates an error message. You must run the Setup Utility to change the BIOS settings from the default or current configuration. Accessing the Setup Utility 1. Turn on the monitor and the server. If the server is already turned on, save your data and exit all open applications, and then restart the server. During POST, press F10. If you fail to press F10 before POST is completed, you need to restart the server and repeat this step. The first page displayed is the Main menu. Use the left (←) and right (→) arrow keys to move between selections on the menu bar. Navigating through the Setup Utility Use the keys listed in the legend bar on the bottom of the Setup Utility screen to access the various menu and submenu screens of the Setup Utility. Table 1 lists these legend keys and their respective functions. Table 1 Setup Utility Navigation Keys Key ← and → ↑ and ↓ Enter, Tab, or Shift-Tab Esc , F1 F10 Function Select different screens. Select items in each menu. Select a field value or display a submenu screen. Display more options for items marked with . Exit the CMOS Setup menu. Configure the system time or change field. To bring up the General Help window. The General Help window describes other Setup navigation keys that are not displayed on the legend bar. To save changes and exit the CMOS Setup Utility. System BIOS configuration 5
-
 1
1 -
 2
2 -
 3
3 -
 4
4 -
 5
5 -
 6
6 -
 7
7 -
 8
8 -
 9
9 -
 10
10 -
 11
11 -
12
-
13
-
14
-
15
-
16
-
17
-
18
-
19
-
20
-
21
-
22
-
23
-
24
-
25
-
26
-
27
-
28
-
29
-
30
-
31
-
32
-
33
-
34
-
35
-
36
-
37
-
38
-
39
-
40
-
41
-
42
-
43
-
44
-
45
-
46
-
47
-
48
-
49
-
50
 |
 |