HP StorageWorks MSA 2/8 HP StorageWorks MSA SAN Switch 2/8 Installation Guide - Page 26
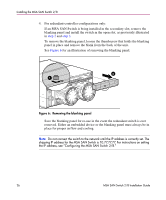
for an illustration of removing the blanking panel.
 |
View all HP StorageWorks MSA 2/8 manuals
Add to My Manuals
Save this manual to your list of manuals |
Page 26 highlights
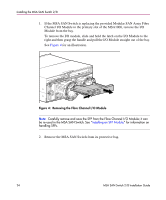
Installing the MSA SAN Switch 2/8 4. For redundant-controller configurations only: If an MSA SAN Switch is being installed in the secondary slot, remove the blanking panel and install the switch in the open slot, as previously illustrated in step 2 and step 3. To remove the blanking panel, loosen the thumbscrew that holds the blanking panel in place and remove the blank from the back of the unit. See Figure 6 for an illustration of removing the blanking panel. 2 1 Figure 6: Removing the blanking panel Save the blanking panel for re-use in the event the redundant switch is ever removed. Either an embedded device or the blanking panel must always be in place for proper airflow and cooling. Note: Do not connect the switch to the network until the IP address is correctly set. The shipping IP address for the MSA SAN Switch is 10.77.77.77. For instructions on setting the IP address, see "Configuring the MSA SAN Switch 2/8." 26 MSA SAN Switch 2/8 Installation Guide
-
 1
1 -
2
-
3
-
4
-
5
-
6
-
7
-
8
-
9
-
10
-
11
-
12
-
13
-
14
-
15
-
16
-
17
-
18
-
19
-
20
-
 21
21 -
 22
22 -
 23
23 -
 24
24 -
 25
25 -
 26
26 -
 27
27 -
 28
28 -
 29
29 -
 30
30 -
 31
31 -
32
-
33
-
34
-
35
-
36
-
37
-
38
-
39
-
40
-
41
-
42
-
43
-
44
-
45
-
46
-
47
-
48
-
49
-
50
-
51
-
52
-
53
-
54
-
55
-
56
-
57
-
58
-
59
-
60
-
61
-
62
-
63
-
64
-
65
-
66
-
67
-
68
-
69
-
70
-
71
-
72
 |
 |