HP StorageWorks MSA 2/8 HP StorageWorks MSA SAN Switch 2/8 Installation Guide - Page 34
Setting Network Addresses
 |
View all HP StorageWorks MSA 2/8 manuals
Add to My Manuals
Save this manual to your list of manuals |
Page 34 highlights
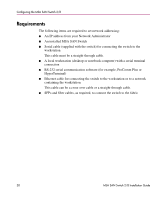
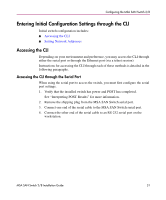
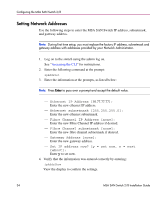
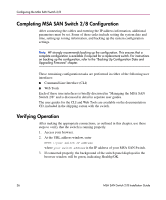
Configuring the MSA SAN Switch 2/8 Setting Network Addresses Use the following steps to enter the MSA SAN Switch IP address, subnetmask, and gateway address. Note: During first time setup, you must replace the factory IP address, subnetmask and gateway address with addresses provided by your Network Administrator. 1. Log on to the switch using the admin log on. See "Accessing the CLI" for instructions. 2. Enter the following command at the prompt: ipAddrSet 3. Enter the information at the prompts, as listed below: Note: Press Enter to pass over a prompt and accept the default value. - Ethernet IP Address [10.77.77.77]: Enter the new ethernet IP address. - Ethernet subnetmask [255.255.255.0]: Enter the new ethernet subnetmask. - Fibre Channel IP Address [none]: Enter the new Fibre Channel IP address if desired. - Fibre Channel subnetmask [none]: Enter the new fibre channel subnetmask if desired. - Gateway Address [none]: Enter the new gateway address. - Set IP address now? [y = set now, n = next reboot]: Enter y to set now. 4. Verify that the information was entered correctly by entering: ipAddrShow View the display to confirm the settings. 34 MSA SAN Switch 2/8 Installation Guide
-
 1
1 -
2
-
3
-
4
-
5
-
6
-
7
-
8
-
9
-
10
-
11
-
12
-
13
-
14
-
15
-
16
-
17
-
18
-
19
-
20
-
21
-
22
-
23
-
24
-
25
-
26
-
27
-
28
-
 29
29 -
 30
30 -
 31
31 -
 32
32 -
 33
33 -
 34
34 -
 35
35 -
 36
36 -
 37
37 -
 38
38 -
 39
39 -
40
-
41
-
42
-
43
-
44
-
45
-
46
-
47
-
48
-
49
-
50
-
51
-
52
-
53
-
54
-
55
-
56
-
57
-
58
-
59
-
60
-
61
-
62
-
63
-
64
-
65
-
66
-
67
-
68
-
69
-
70
-
71
-
72
 |
 |
