HP StorageWorks MSA 2/8 HP StorageWorks MSA SAN Switch 2/8 Installation Guide - Page 28
positioning each cable so that the key the ridge on one side of the cable
 |
View all HP StorageWorks MSA 2/8 manuals
Add to My Manuals
Save this manual to your list of manuals |
Page 28 highlights
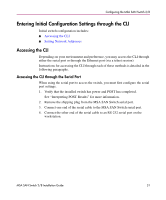
Installing the MSA SAN Switch 2/8 Note: For dust and ESD (electrostatic discharge) protection, a cover is provided for each optical port and should be kept on the port whenever the port is not in use. Caution: Do not connect the switch to a configured SAN without first configuring the switch. 4. Connect the cables to the SFPs as appropriate to the fabric topology, by positioning each cable so that the key (the ridge on one side of the cable connector) is aligned with the slot in the SFP. Insert the cable into the SFP until it is firmly seated and the latching mechanism clicks. 5. Proceed to the following chapter in this guide to configure the MSA SAN Switch for your SAN and verify its operation. 28 MSA SAN Switch 2/8 Installation Guide
-
 1
1 -
2
-
3
-
4
-
5
-
6
-
7
-
8
-
9
-
10
-
11
-
12
-
13
-
14
-
15
-
16
-
17
-
18
-
19
-
20
-
21
-
22
-
 23
23 -
 24
24 -
 25
25 -
 26
26 -
 27
27 -
 28
28 -
 29
29 -
 30
30 -
 31
31 -
 32
32 -
 33
33 -
34
-
35
-
36
-
37
-
38
-
39
-
40
-
41
-
42
-
43
-
44
-
45
-
46
-
47
-
48
-
49
-
50
-
51
-
52
-
53
-
54
-
55
-
56
-
57
-
58
-
59
-
60
-
61
-
62
-
63
-
64
-
65
-
66
-
67
-
68
-
69
-
70
-
71
-
72
 |
 |

Installing the MSA SAN Switch 2/8
28
MSA SAN Switch 2/8 Installation Guide
Note:
For dust and ESD (electrostatic discharge) protection, a cover is provided for
each optical port and should be kept on the port whenever the port is not in use.
Caution:
Do not connect the switch to a configured SAN without first
configuring the switch.
4.
C
onnect the cables to the SFPs as appropriate to the fabric topology, by
positioning each cable so that the key (the ridge on one side of the cable
connector) is aligned with the slot in the SFP.
Insert the cable into the SFP until it is firmly seated and the latching
mechanism clicks.
5.
Proceed to the following chapter in this guide to configure the MSA SAN
Switch for your SAN and verify its operation.