HP Vs15 HP Pavilion Desktop PCs - FX75 Flat Panel Display - (English) User Gu - Page 23
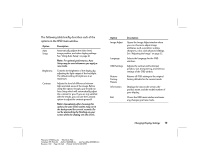
The following table briefly describes each of the, options in the OSD main window. - backlight
 |
UPC - 829160547435
View all HP Vs15 manuals
Add to My Manuals
Save this manual to your list of manuals |
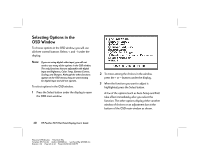
Page 23 highlights
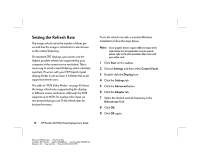
The following table briefly describes each of the options in the OSD main window. Option Auto Setup Description Automatically adjusts the video level, image position, and other display settings. See "Using Auto Setup" on page 21. Note: For optimal performance, Auto Setup may be used whenever you apply a new mode. Brightness Controls the brightness of the display by adjusting the light output of the backlight. The default setting of brightness is at maximum. Contrast Adjusts the level of difference between light and dark areas of the image. Before using this option, though, you should run Auto Setup which will automatically adjust the contrast for you. If you are not satisfied with the results, you can use the Contrast option to adjust the contrast yourself. Note: Immediately after choosing this option, the auto level routine may run in the background for several seconds. Do not be alarmed by the flashing on your screen while the display sets the levels. Option Image Adjust Language OSD Settings Restore Factory Presets Information Exit Description Opens the Image Adjust window where you can choose to adjust image attributes, such as position, scaling, sharpness, color, and advanced settings. See "Adjusting the Image" on page 22. Selects the language for the OSD windows. Adjusts the vertical and horizontal position, size, transparency, and timeout settings of the OSD window. Returns all OSD settings to the original factory defaults for the current mode. Displays the microcode version, the product name, and the model number of your display. Closes the OSD main window and saves any changes you have made. Changing Display Settings 19 Filename: fx75UGrw.doc Title: Book Title Template: HP-Print.dot Author: WASSER, Inc. Last Saved By: WASSER, Inc. Revision #: 30 Page: 19 of 43 Printed: 10/16/00 03:31 PM
-
 1
1 -
2
-
3
-
4
-
5
-
6
-
7
-
8
-
9
-
10
-
11
-
12
-
13
-
14
-
15
-
16
-
17
-
 18
18 -
 19
19 -
 20
20 -
 21
21 -
 22
22 -
 23
23 -
 24
24 -
 25
25 -
 26
26 -
 27
27 -
 28
28 -
29
-
30
-
31
-
32
-
33
-
34
-
35
-
36
-
37
-
38
-
39
-
40
-
41
-
42
-
43
 |
 |