HP Vs15 HP Pavilion Desktop PCs - FX75 Flat Panel Display - (English) User Gu - Page 32
Neutral, Adjusting RGB or Black Level, Image Adjust, Color, RGB Adjust, Black Level Adjust, Green
 |
UPC - 829160547435
View all HP Vs15 manuals
Add to My Manuals
Save this manual to your list of manuals |
Page 32 highlights
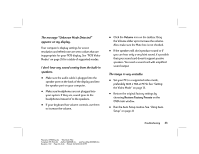
8 Press the + or - buttons to highlight Cool, Neutral, or Warm. Note: As you highlight an option, your screen immediately updates to reflect this setting. 9 Press the Select button. 10 When you are done with all color adjustments, make sure you save your color settings. See "Saving and Restoring Color Settings" on page 29. Adjusting RGB or Black Level The RGB Adjust option processes red, green, and blue color data. This control may be helpful in achieving a more natural appearance in graphic images and closer color matching between the printer and the display. The Black Level Adjust option sets the black level for red, green, and blue. To adjust RGB or black level: 1 Press the Select button under the display to open the OSD main window. 2 Press the + or - buttons under the display until the Image Adjust function is highlighted. 3 Press the Select button. 4 Press the + or - buttons until the Color function is highlighted. 5 Press the Select button. Note: The Color window appears. 6 Press the + or - buttons to highlight RGB Adjust or Black Level Adjust. 7 Press the Select button. 8 Highlight the color you want to adjust: Red, Green, or Blue. 28 HP Pavilion FX75 Flat Panel Display User's Guide Filename: fx75UGrw.doc Title: Book Title Template: HP-Print.dot Author: WASSER, Inc. Last Saved By: WASSER, Inc. Revision #: 30 Page: 28 of 43 Printed: 10/16/00 03:31 PM
-
 1
1 -
2
-
3
-
4
-
5
-
6
-
7
-
8
-
9
-
10
-
11
-
12
-
13
-
14
-
15
-
16
-
17
-
18
-
19
-
20
-
21
-
22
-
23
-
24
-
25
-
26
-
 27
27 -
 28
28 -
 29
29 -
 30
30 -
 31
31 -
 32
32 -
 33
33 -
 34
34 -
 35
35 -
 36
36 -
 37
37 -
38
-
39
-
40
-
41
-
42
-
43
 |
 |