JVC KW-Z1000W Instruction Manual America - Page 23
USB, Connecting a USB device, USB Basic Operation, Disconnect the USB device, Usable USB device
 |
View all JVC KW-Z1000W manuals
Add to My Manuals
Save this manual to your list of manuals |
Page 23 highlights
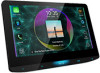
USB Connecting a USB device 1 Connect the USB device with the USB cable. (P.95) 2 Press the [ ]/[ ] button. hhHOME screen appears. 3 Touch [ ]. 4 Touch [USB]. (P.12) ÑÑDisconnect the USB device 1 Press the [ ]/[ ] button. hhHOME screen appears. 2 Touch a source other than [USB]. 3 Detach the USB device. ÑÑUsable USB device You can use a mass-storage-class USB device with this unit. The word "USB device" appearing in this manual indicates a flash memory device. ●●About the file system The file system should be the one of the following. • FAT16 • FAT32 • exFAT • NTFS NOTE • Install the USB device in the place where it will not affect safe driving. • You cannot connect a USB device via a USB hub and Multi Card Reader. • Take backups of the audio files used with this unit. The files can be erased depending on the operating conditions of the USB device. We shall have no compensation for any damage arising from any erased data. USB USB Basic Operation Most functions can be controlled from the source control screen and playback screen. Control screen 1 2 3 6 4 5 Open the drawer 7 3 6 3 6 1 [CODEC] When a high-resolution source is played, its format information is displayed. 2 Operation keys • [1] : Searches track/file. For details on search operation, see Search Operation (P.24). • [E] [F] : Searches the previous/next track/ file. Touch and hold to fast forward or fast backward. (It will be cancelled automatically after about 50 seconds.) • [DH] : Plays or pauses. • [ ] : Touch to attenuate/restore the sound. English 23
-
 1
1 -
2
-
3
-
4
-
5
-
6
-
7
-
8
-
9
-
10
-
11
-
12
-
13
-
14
-
15
-
16
-
17
-
 18
18 -
 19
19 -
 20
20 -
 21
21 -
 22
22 -
 23
23 -
 24
24 -
 25
25 -
 26
26 -
 27
27 -
 28
28 -
29
-
30
-
31
-
32
-
33
-
34
-
35
-
36
-
37
-
38
-
39
-
40
-
41
-
42
-
43
-
44
-
45
-
46
-
47
-
48
-
49
-
50
-
51
-
52
-
53
-
54
-
55
-
56
-
57
-
58
-
59
-
60
-
61
-
62
-
63
-
64
-
65
-
66
-
67
-
68
-
69
-
70
-
71
-
72
-
73
-
74
-
75
-
76
-
77
-
78
-
79
-
80
-
81
-
82
-
83
-
84
-
85
-
86
-
87
-
88
-
89
-
90
-
91
-
92
-
93
-
94
-
95
-
96
-
97
-
98
-
99
-
100
-
101
-
102
-
103
-
104
-
105
-
106
-
107
-
108
-
109
-
110
-
111
-
112
 |
 |
