LG P925 User Guide - Page 46
Using the advanced, settings Camera - review
 |
View all LG P925 manuals
Add to My Manuals
Save this manual to your list of manuals |
Page 46 highlights
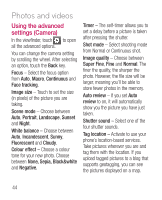
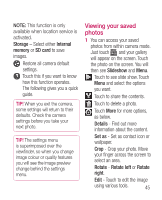
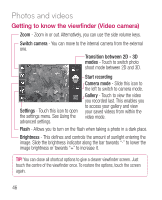
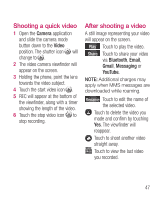
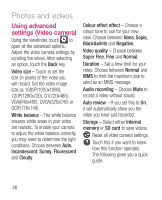
Photos and videos Using the advanced settings (Camera) In the viewfinder, touch to open all the advanced options. You can change the camera setting by scrolling the wheel. After selecting an option, touch the Back key. Focus - Select the focus option from Auto, Macro, Continuous and Face tracking. Image size - Touch to set the size (in pixels) of the picture you are taking. Scene mode - Choose between Auto, Portrait, Landscape, Sunset and Night. White balance - Choose between Auto, Incandescent, Sunny, Fluorescent and Cloudy. Colour effect - Choose a colour tone for your new photo. Choose between None, Sepia, Black&white and Negative. Timer - The self-timer allows you to set a delay before a picture is taken after pressing the shutter. Shot mode - Select shooting mode from Normal or Continuous shot. Image quality - Choose between Super Fine, Fine and Normal. The finer the quality, the sharper the photo. However, the file size will be larger, meaning you'll be able to store fewer photos in the memory. Auto review - If you set Auto review to on, it will automatically show you the picture you have just taken. Shutter sound - Select one of the four shutter sounds. Tag location - Activate to use your phone's location-based services. Take pictures wherever you are and tag them with the location. If you upload tagged pictures to a blog that supports geotagging, you can see the pictures displayed on a map. 44
-
 1
1 -
2
-
3
-
4
-
5
-
6
-
7
-
8
-
9
-
10
-
11
-
12
-
13
-
14
-
15
-
16
-
17
-
18
-
19
-
20
-
21
-
22
-
23
-
24
-
25
-
26
-
27
-
28
-
29
-
30
-
31
-
32
-
33
-
34
-
35
-
36
-
37
-
38
-
39
-
40
-
 41
41 -
 42
42 -
 43
43 -
 44
44 -
 45
45 -
 46
46 -
 47
47 -
 48
48 -
 49
49 -
 50
50 -
 51
51 -
52
-
53
-
54
-
55
-
56
-
57
-
58
-
59
-
60
-
61
-
62
-
63
-
64
-
65
-
66
-
67
-
68
-
69
-
70
-
71
-
72
-
73
-
74
-
75
-
76
-
77
-
78
-
79
-
80
-
81
-
82
-
83
-
84
-
85
-
86
-
87
-
88
-
89
-
90
-
91
-
92
-
93
-
94
-
95
-
96
-
97
-
98
-
99
-
100
-
101
-
102
-
103
-
104
-
105
-
106
-
107
-
108
-
109
-
110
-
111
-
112
-
113
-
114
-
115
-
116
-
117
-
118
-
119
-
120
-
121
-
122
-
123
-
124
-
125
-
126
-
127
-
128
-
129
-
130
 |
 |