Lenovo ThinkCentre M92z Hardware Maintenance Manual - ThinkCentre M92z (type 3 - Page 120
Disconnect the LCD cables from the display connectors on the system board and the converter board.
 |
View all Lenovo ThinkCentre M92z manuals
Add to My Manuals
Save this manual to your list of manuals |
Page 120 highlights
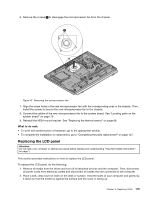
3. Remove the computer cover. See "Removing the computer cover" on page 83. 4. Locate the LCD panel. See "Locating major FRUs and CRUs (for models with the 20-inch display)" on page 73 or "Locating major FRUs and CRUs (for models with the 23-inch display)" on page 76. 5. Remove the 13 screws that secure the LCD bracket to the front bezel. Figure 44. Removing the LCD bracket 6. Disconnect the cables of the components secured to the front bezel from the system board. Then, lift the LCD bracket off the front bezel. 7. Disconnect the LCD cables from the display connectors on the system board and the converter board. See "Locating parts on the system board" on page 79. 8. Remove the four screws to disengage the LCD panel from the LCD bracket. Figure 45. Removing the LCD panel 116 ThinkCentre Hardware Maintenance Manual
-
 1
1 -
2
-
3
-
4
-
5
-
6
-
7
-
8
-
9
-
10
-
11
-
12
-
13
-
14
-
15
-
16
-
17
-
18
-
19
-
20
-
21
-
22
-
23
-
24
-
25
-
26
-
27
-
28
-
29
-
30
-
31
-
32
-
33
-
34
-
35
-
36
-
37
-
38
-
39
-
40
-
41
-
42
-
43
-
44
-
45
-
46
-
47
-
48
-
49
-
50
-
51
-
52
-
53
-
54
-
55
-
56
-
57
-
58
-
59
-
60
-
61
-
62
-
63
-
64
-
65
-
66
-
67
-
68
-
69
-
70
-
71
-
72
-
73
-
74
-
75
-
76
-
77
-
78
-
79
-
80
-
81
-
82
-
83
-
84
-
85
-
86
-
87
-
88
-
89
-
90
-
91
-
92
-
93
-
94
-
95
-
96
-
97
-
98
-
99
-
100
-
101
-
102
-
103
-
104
-
105
-
106
-
107
-
108
-
109
-
110
-
111
-
112
-
113
-
114
-
 115
115 -
 116
116 -
 117
117 -
 118
118 -
 119
119 -
 120
120 -
 121
121 -
 122
122 -
 123
123 -
 124
124 -
 125
125 -
126
-
127
-
128
-
129
-
130
-
131
-
132
-
133
-
134
-
135
-
136
-
137
-
138
-
139
-
140
-
141
-
142
-
143
-
144
 |
 |
