Lenovo ThinkPad 380ED English - Windows 2000 Professional Setup Guide - Page 26
Installing the IBM ThinkPad Notebook Manager on ThinkPad i Series models
 |
View all Lenovo ThinkPad 380ED manuals
Add to My Manuals
Save this manual to your list of manuals |
Page 26 highlights
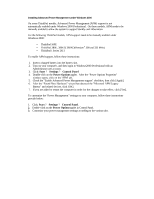
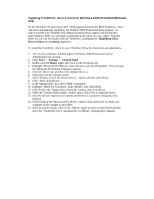
2. If the 'ThinkPad Configuration" icon is visible in the desktop Taskbar, disable it by right-click the icon and click 'Disable'. 3. Click: Start ? Settings ? Control Panel. 4. Double-click Add/Remove Programs applet. Highlight "Configuration Utility" and then click [Change/Remove]. 5. Click [Yes] to remove the 'Configuration Utility' and all of its components. 6. If a prompt asking, "Remove Shared File?" is presented, click [Yes To All], then click [Yes] to proceed removing all shared components. 7. Click [OK] to close the "Remove Programs..." window. 8. Click [Close] to close the "Add/Remove Programs". 9. Turn off and restart the computer. 10. Start the computer and logon to Windows 2000 Professional with an Administrator user account. 11. Run the ThinkPad Configuration Utility Setup program again. This time the Setup will complete without interruptions. Installing the IBM ThinkPad Notebook Manager on ThinkPad i Series models If your ThinkPad is an i Series model, follow the instructions below to install the ThinkPad Notebook Manager for Windows 2000: 1. Turn on your computer, and then logon to Windows 2000 Professional with an Administrator user account. 2. Locate the downloaded ThinkPad Configuration Utility for Windows 2000 package and double-click it to extract the setup files to your hard drive. 3. Click: Start ? Run. 4. Type C:\default_subdirectory\SETUP.EXE in the "Open" field, where C:\default_subdirectory is the path to the files your extracted in the previous step. 5. Press "ENTER" after providing the correct path. 6. Click [Next] at the Welcome screen. The "Notebook Manager" will be automatically installed to the 'C:\Program Files\Notebook Manager' folder. For best results, accept the default folder for the files to be copied to. 7. Click [Next] to start coping files to your system. 8. After all files have been copied to your computer, click [OK]. The installation has completed. 9. Click [Finish] to restart your computer now in order for changes to take affect. Installing the IBM ThinkPad Configuration Utility on the ThinkPad 240 If your computer is a ThinkPad model 240, follow the instructions below to install the ThinkPad Configuration Utility for Windows 2000: 1. Turn on your computer, and then logon to Windows 2000 Professional with an Administrator user account. 2. Locate the downloaded ThinkPad Configuration Utility for Windows 2000 package and double-click it to extract the setup files to your hard drive. 3. Click: Start ? Run. 4. Type C:\default_subdirectory\SETUP.EXE in the "Open" field, where C:\default_subdirectory is the path to the files you extracted in the previous step. 5. Press "ENTER" after providing the correct path. 6. Click [Next] at the Welcome screen. The "Configuration Utility" will be installed to the 'C:\ThinkPad' folder.
-
 1
1 -
2
-
3
-
4
-
5
-
6
-
7
-
8
-
9
-
10
-
11
-
12
-
13
-
14
-
15
-
16
-
17
-
18
-
19
-
20
-
 21
21 -
 22
22 -
 23
23 -
 24
24 -
 25
25 -
 26
26 -
 27
27 -
 28
28 -
 29
29 -
 30
30 -
 31
31 -
32
-
33
-
34
-
35
-
36
-
37
-
38
-
39
-
40
-
41
-
42
-
43
-
44
-
45
-
46
-
47
-
48
-
49
-
50
-
51
-
52
-
53
-
54
-
55
-
56
-
57
-
58
-
59
-
60
-
61
-
62
-
63
-
64
-
65
-
66
-
67
-
68
-
69
-
70
 |
 |