Lexmark P450 User's Guide - Page 26
Viewing a slide show, Video output
 |
View all Lexmark P450 manuals
Add to My Manuals
Save this manual to your list of manuals |
Page 26 highlights
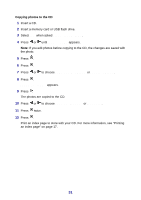
Viewing a slide show Viewing a photo slide show You can view a slide show of the photos saved on a photo storage device. 1 Insert a memory card, CD, or USB flash drive; connect a PictBridge-enabled digital camera; or make sure a Bluetooth adapter is attached. 2 Press repeatedly until Slide Show appears. 3 Press . 4 Press to view the photos on the display, or press , and then press to view the photos on your TV. 5 Press . 6 Press to begin the slide show. Press • to pause • to continue • to select a photo • to rotate Note: When you have completed viewing the slide show, return to the View & Print menu to print any selected photos, or go to the Save / Copy menu to copy the selected photos to the USB flash drive or to the CD. Video output The printer lets you view the photo slide show on the printer display on your TV screen. To connect a TV to the printer, use a video cable and the video port located on the back of the printer. Note: Make sure you select the correct video output type from the Setup menu. For more information, see "Navigating the display menus" on page 13. 26
-
 1
1 -
2
-
3
-
4
-
5
-
6
-
7
-
8
-
9
-
10
-
11
-
12
-
13
-
14
-
15
-
16
-
17
-
18
-
19
-
20
-
 21
21 -
 22
22 -
 23
23 -
 24
24 -
 25
25 -
 26
26 -
 27
27 -
 28
28 -
 29
29 -
 30
30 -
 31
31 -
32
-
33
-
34
-
35
-
36
-
37
-
38
-
39
-
40
-
41
-
42
-
43
-
44
-
45
-
46
-
47
-
48
-
49
-
50
-
51
-
52
-
53
-
54
-
55
-
56
 |
 |