Lexmark Platinum Pro905 User's Guide - Page 38
Collating printed copies, Printing s in reverse order - printer software
 |
View all Lexmark Platinum Pro905 manuals
Add to My Manuals
Save this manual to your list of manuals |
Page 38 highlights
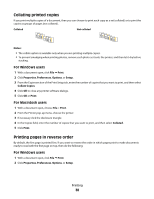
Collating printed copies If you print multiple copies of a document, then you can choose to print each copy as a set (collated) or to print the copies as groups of pages (not collated). Collated Not collated Notes: • The collate option is available only when you are printing multiple copies. • To prevent smudging when printing photos, remove each photo as it exits the printer, and then let it dry before stacking. For Windows users 1 With a document open, click File Print. 2 Click Properties, Preferences, Options, or Setup. 3 From the Copies section of the Print Setup tab, enter the number of copies that you want to print, and then select Collate Copies. 4 Click OK to close any printer software dialogs. 5 Click OK or Print. For Macintosh users 1 With a document open, choose File > Print. 2 From the Printer pop-up menu, choose the printer. 3 If necessary click the disclosure triangle. 4 In the Copies field, enter the number of copies that you want to print, and then select Collated. 5 Click Print. Printing pages in reverse order By default, the first page is printed first. If you want to reverse the order in which pages print to make documents ready to read with the first page on top, then do the following: For Windows users 1 With a document open, click File Print. 2 Click Properties, Preferences, Options, or Setup. Printing 38
-
 1
1 -
2
-
3
-
4
-
5
-
6
-
7
-
8
-
9
-
10
-
11
-
12
-
13
-
14
-
15
-
16
-
17
-
18
-
19
-
20
-
21
-
22
-
23
-
24
-
25
-
26
-
27
-
28
-
29
-
30
-
31
-
32
-
 33
33 -
 34
34 -
 35
35 -
 36
36 -
 37
37 -
 38
38 -
 39
39 -
 40
40 -
 41
41 -
 42
42 -
 43
43 -
44
-
45
-
46
-
47
-
48
-
49
-
50
-
51
-
52
-
53
-
54
-
55
-
56
-
57
-
58
-
59
-
60
-
61
-
62
-
63
-
64
-
65
-
66
-
67
-
68
-
69
-
70
-
71
-
72
-
73
-
74
-
75
-
76
-
77
-
78
-
79
-
80
-
81
-
82
-
83
-
84
-
85
-
86
-
87
-
88
-
89
-
90
-
91
-
92
-
93
-
94
-
95
-
96
-
97
-
98
-
99
-
100
-
101
-
102
-
103
-
104
-
105
-
106
-
107
-
108
-
109
-
110
-
111
-
112
-
113
-
114
-
115
-
116
-
117
-
118
-
119
-
120
-
121
-
122
-
123
-
124
-
125
-
126
-
127
-
128
-
129
-
130
-
131
-
132
-
133
-
134
-
135
-
136
-
137
-
138
-
139
-
140
-
141
-
142
-
143
-
144
-
145
-
146
-
147
-
148
-
149
-
150
-
151
-
152
-
153
-
154
-
155
-
156
-
157
-
158
-
159
-
160
-
161
-
162
-
163
-
164
-
165
-
166
-
167
-
168
-
169
-
170
-
171
-
172
-
173
-
174
-
175
-
176
-
177
-
178
-
179
-
180
-
181
-
182
-
183
-
184
-
185
-
186
-
187
-
188
-
189
-
190
-
191
-
192
-
193
-
194
-
195
-
196
-
197
-
198
-
199
 |
 |