Linksys SPA921 Cisco SPA9000 Voice System Using Setup Wizard Installation and - Page 138
Advanced Features
 |
UPC - 745883570799
View all Linksys SPA921 manuals
Add to My Manuals
Save this manual to your list of manuals |
Page 138 highlights
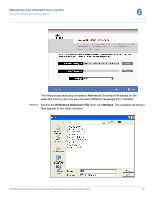
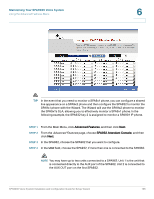
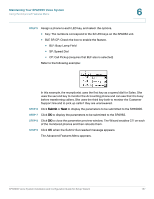
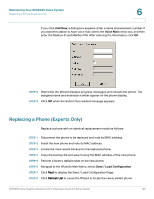
Maintaining Your SPA9000 Voice System Using the Advanced Features Menu 6 TIP In the event that you need to monitor a SPA9x1 phone, you can configure a shared line appearance on a SPA9x2 phone and then configure the SPA932 to monitor the SPA9x1 phone with the Wizard. The Wizard will use the SPA9x2 phone to monitor the SPA9x1's SLA, allowing you to effectively monitor a SPA9x1 phone. In the following example, the SPA932 key 2 is assigned to monitor a SPA901 IP phone. STEP 1 From the Main Menu, click Advanced Features, and then click Next. STEP 2 From the Advanced Features page, choose SPA932 Attendant Console, and then click Next. STEP 3 In the SPA962, choose the SPA962 that you want to configure. STEP 4 In the Unit field, choose the SPA932, if more than one is connected to the SPA962. NOTE You may have up to two units connected to a SPA962. Unit 1 is the unit that is connected directly to the AUX port of the SPA962. Unit 2 is connected to the AUX OUT port on the first SPA932. SPA9000 Voice System Installation and Configuration Guide for Setup Wizard 136
-
 1
1 -
2
-
3
-
4
-
5
-
6
-
7
-
8
-
9
-
10
-
11
-
12
-
13
-
14
-
15
-
16
-
17
-
18
-
19
-
20
-
21
-
22
-
23
-
24
-
25
-
26
-
27
-
28
-
29
-
30
-
31
-
32
-
33
-
34
-
35
-
36
-
37
-
38
-
39
-
40
-
41
-
42
-
43
-
44
-
45
-
46
-
47
-
48
-
49
-
50
-
51
-
52
-
53
-
54
-
55
-
56
-
57
-
58
-
59
-
60
-
61
-
62
-
63
-
64
-
65
-
66
-
67
-
68
-
69
-
70
-
71
-
72
-
73
-
74
-
75
-
76
-
77
-
78
-
79
-
80
-
81
-
82
-
83
-
84
-
85
-
86
-
87
-
88
-
89
-
90
-
91
-
92
-
93
-
94
-
95
-
96
-
97
-
98
-
99
-
100
-
101
-
102
-
103
-
104
-
105
-
106
-
107
-
108
-
109
-
110
-
111
-
112
-
113
-
114
-
115
-
116
-
117
-
118
-
119
-
120
-
121
-
122
-
123
-
124
-
125
-
126
-
127
-
128
-
129
-
130
-
131
-
132
-
 133
133 -
 134
134 -
 135
135 -
 136
136 -
 137
137 -
 138
138 -
 139
139 -
 140
140 -
 141
141 -
 142
142 -
 143
143 -
144
-
145
-
146
-
147
-
148
-
149
-
150
-
151
-
152
-
153
-
154
-
155
-
156
-
157
-
158
-
159
-
160
-
161
-
162
-
163
 |
 |
