Linksys SPA921 Cisco SPA9000 Voice System Using Setup Wizard Installation and - Page 139
Step 5, Step 6, Step 7, Step 8, Step 9
 |
UPC - 745883570799
View all Linksys SPA921 manuals
Add to My Manuals
Save this manual to your list of manuals |
Page 139 highlights
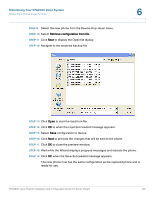
Maintaining Your SPA9000 Voice System Using the Advanced Features Menu 6 STEP 5 Assign a phone to each LED key, and select the options. • Key: The numbers correspond to the 32 LED keys on the SPA932 unit. • BLF, SP, CP: Check the box to enable the feature. • BLF: Busy Lamp Field • SP: Speed Dial • CP: Call Pickup (requires that BLF also is selected) Refer to the following example: In this example, the receptionist uses the first key as a speed dial for Sales. She uses the second key to monitor the Accounting phone and can see that it is busy before transferring callers. She uses the third key both to monitor the Customer Support line and to pick up calls if they are unanswered. STEP 6 Click Submit or Next to display the parameters to be submitted to the SPA9000. STEP 7 Click OK to display the parameters to be submitted to the SPA962. STEP 8 Click OK to close the parameter preview window. The Wizard enables CTI on each of the monitored phones and then reboots them. STEP 9 Click OK when the Submit Succeeded message appears. The Advanced Features Menu appears. SPA9000 Voice System Installation and Configuration Guide for Setup Wizard 137
-
 1
1 -
2
-
3
-
4
-
5
-
6
-
7
-
8
-
9
-
10
-
11
-
12
-
13
-
14
-
15
-
16
-
17
-
18
-
19
-
20
-
21
-
22
-
23
-
24
-
25
-
26
-
27
-
28
-
29
-
30
-
31
-
32
-
33
-
34
-
35
-
36
-
37
-
38
-
39
-
40
-
41
-
42
-
43
-
44
-
45
-
46
-
47
-
48
-
49
-
50
-
51
-
52
-
53
-
54
-
55
-
56
-
57
-
58
-
59
-
60
-
61
-
62
-
63
-
64
-
65
-
66
-
67
-
68
-
69
-
70
-
71
-
72
-
73
-
74
-
75
-
76
-
77
-
78
-
79
-
80
-
81
-
82
-
83
-
84
-
85
-
86
-
87
-
88
-
89
-
90
-
91
-
92
-
93
-
94
-
95
-
96
-
97
-
98
-
99
-
100
-
101
-
102
-
103
-
104
-
105
-
106
-
107
-
108
-
109
-
110
-
111
-
112
-
113
-
114
-
115
-
116
-
117
-
118
-
119
-
120
-
121
-
122
-
123
-
124
-
125
-
126
-
127
-
128
-
129
-
130
-
131
-
132
-
133
-
 134
134 -
 135
135 -
 136
136 -
 137
137 -
 138
138 -
 139
139 -
 140
140 -
 141
141 -
 142
142 -
 143
143 -
 144
144 -
145
-
146
-
147
-
148
-
149
-
150
-
151
-
152
-
153
-
154
-
155
-
156
-
157
-
158
-
159
-
160
-
161
-
162
-
163
 |
 |
