Netgear RND2150 RND2110 User Manual - Page 14
Setting Up Your Network Connection, Ethernet Interface Settings - readynas duo
 |
UPC - 606449056822
View all Netgear RND2150 manuals
Add to My Manuals
Save this manual to your list of manuals |
Page 14 highlights
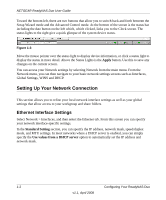
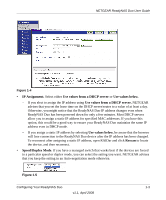
NETGEAR ReadyNAS Duo User Guide Toward the bottom left, there are two buttons that allow you to switch back and forth between the Setup Wizard mode and the Advanced Control mode. At the bottom of the screen is the status bar including the date button on the left which, which clicked, links you to the Clock screen. The status lights to the right give a quick glimpse of the system device status. Figure 1-3 Move the mouse pointer over the status light to display device information, or click a status light to display the status in more detail. Above the Status Lights is the Apply button. Use this to save any changes on the current screen. You can access your Network settings by selecting Network from the main menu. From the Network menu, you can then navigate to your basic network settings screens such as Interfaces, Global Settings, WINS and DHCP. Setting Up Your Network Connection This section allows you to refine your local network interface settings as well as your global settings that allow access to your workgroup and share folders. Ethernet Interface Settings Select Network > Interfaces, and then select the Ethernet tab. From this screen you can specify your network interface-specific settings. In the Standard Setting section, you can specify the IP address, network mask, speed/duplex mode, and MTU settings. In most networks where a DHCP server is enabled, you can simply specify the Use values from a DHCP server option to automatically set the IP address and network mask. 1-2 Configuring Your ReadyNAS Duo v1.1, April 2008
-
 1
1 -
2
-
3
-
4
-
5
-
6
-
7
-
8
-
 9
9 -
 10
10 -
 11
11 -
 12
12 -
 13
13 -
 14
14 -
 15
15 -
 16
16 -
 17
17 -
 18
18 -
 19
19 -
20
-
21
-
22
-
23
-
24
-
25
-
26
-
27
-
28
-
29
-
30
-
31
-
32
-
33
-
34
-
35
-
36
-
37
-
38
-
39
-
40
-
41
-
42
-
43
-
44
-
45
-
46
-
47
-
48
-
49
-
50
-
51
-
52
-
53
-
54
-
55
-
56
-
57
-
58
-
59
-
60
-
61
-
62
-
63
-
64
-
65
-
66
-
67
-
68
-
69
-
70
-
71
-
72
-
73
-
74
-
75
-
76
-
77
-
78
-
79
-
80
-
81
-
82
-
83
-
84
-
85
-
86
-
87
-
88
-
89
-
90
-
91
-
92
-
93
-
94
-
95
-
96
-
97
-
98
-
99
-
100
 |
 |
