Netgear RND2150 RND2110 User Manual - Page 83
Replacing a Failed Disk, Ordering a Replacement Disk, Replacing a Failed Disk on the ReadyNAS Duo - warranty
 |
UPC - 606449056822
View all Netgear RND2150 manuals
Add to My Manuals
Save this manual to your list of manuals |
Page 83 highlights
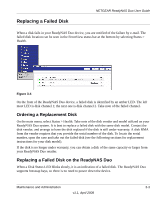
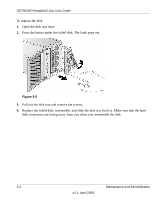
Replacing a Failed Disk NETGEAR ReadyNAS Duo User Guide When a disk fails in your ReadyNAS Duo device, you are notified of the failure by e-mail. The failed disk location can be seen in the FrontView status bar at the bottom by selecting Status > Health. Figure 3-4 On the front of the ReadyNAS Duo device, a failed disk is identified by an amber LED. The left most LED is disk channel 1; the next one is disk channel 2. Take note of the failed channel. Ordering a Replacement Disk On the main menu, select Status > Health. Take note of the disk vendor and model utilized on your ReadyNAS Duo system. It is best to replace a failed disk with the same disk model. Contact the disk vendor, and arrange to have the disk replaced if the disk is still under warranty. A disk RMA from the vendor requires that you provide the serial number of the disk. To locate the serial number, open the case and take out the failed disk (see the following sections for replacement instructions for your disk model). If the disk is no longer under warranty, you can obtain a disk of the same capacity or larger from your ReadyNAS Duo retailer. Replacing a Failed Disk on the ReadyNAS Duo When a Disk Status LED blinks slowly, it is an indication of a failed disk. The ReadyNAS Duo supports hotswap bays, so there is no need to power down the device. Maintenance and Administration 3-3 v1.1, April 2008
-
 1
1 -
2
-
3
-
4
-
5
-
6
-
7
-
8
-
9
-
10
-
11
-
12
-
13
-
14
-
15
-
16
-
17
-
18
-
19
-
20
-
21
-
22
-
23
-
24
-
25
-
26
-
27
-
28
-
29
-
30
-
31
-
32
-
33
-
34
-
35
-
36
-
37
-
38
-
39
-
40
-
41
-
42
-
43
-
44
-
45
-
46
-
47
-
48
-
49
-
50
-
51
-
52
-
53
-
54
-
55
-
56
-
57
-
58
-
59
-
60
-
61
-
62
-
63
-
64
-
65
-
66
-
67
-
68
-
69
-
70
-
71
-
72
-
73
-
74
-
75
-
76
-
77
-
 78
78 -
 79
79 -
 80
80 -
 81
81 -
 82
82 -
 83
83 -
 84
84 -
 85
85 -
 86
86 -
 87
87 -
 88
88 -
89
-
90
-
91
-
92
-
93
-
94
-
95
-
96
-
97
-
98
-
99
-
100
 |
 |
