Netgear RND2150 RND2110 User Manual - Page 39
Setting Share Access, Hosts allowed access, read-only
 |
UPC - 606449056822
View all Netgear RND2150 manuals
Add to My Manuals
Save this manual to your list of manuals |
Page 39 highlights
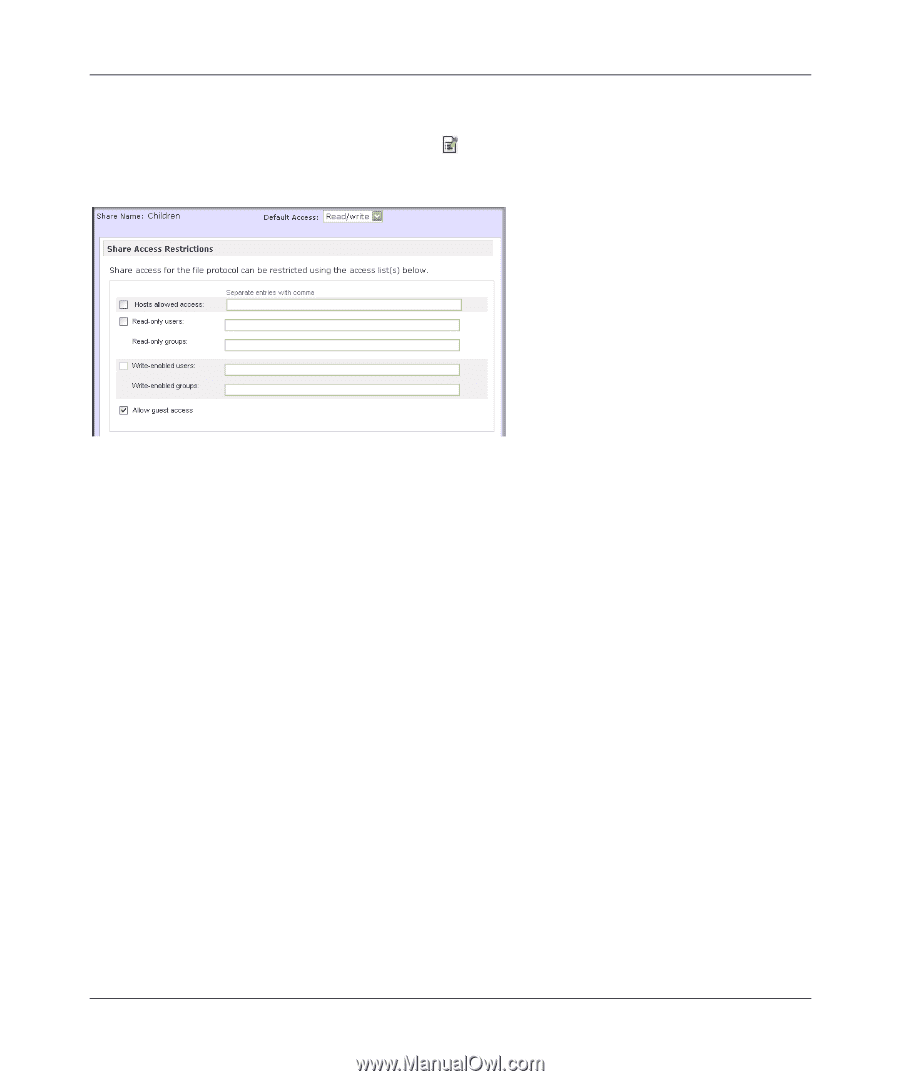
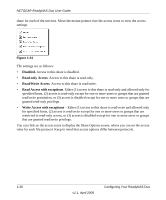
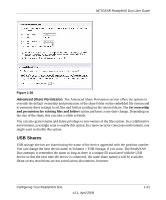
NETGEAR ReadyNAS Duo User Guide Setting Share Access From the Share List screen, click the CIFS link adjacent to the Share whose share access you want to change. In the following example, we selected the Children share; the CIFS (Windows) share options screen looks like the following: Figure 1-32 To set share access: 1. Select the Default Access pull-down menu at the top, select the access to be granted. 2. Select the Hosts allowed access check box and specify one or more hosts that you wish to restrict access to in the adjacent field. For example, select read-only for Default Access and list the hosts to whom you wish to allow access. Access from all other hosts will be denied. To allow only host 192.168.2.101 read-only access to the share, specify the following: • Default: Read-only • Hosts allowed access: 192.168.2.101 Multiple hosts can be separated with commas (see Appendix B, "General Glossary" for information about valid host formats.) For example, if you wish to limit share access to particular hosts, you can enter host IP addresses or valid DNS hostnames in the Host allowed access field. In addition, you can enter a range of hosts using common IP range expressions such as: 192.168.2., 192.168.2.0/255.255.255.0, 192.168.2.0/24 These designations all allow hosts with IP addresses 192.168.2.1 through 192.168.2.254. Toward the bottom of the CIFS screen are the Share Display Option, Recycle Bin, and Advanced CIFS Permissions. Refer to the descriptions for these options in the sections that follow. Configuring Your ReadyNAS Duo v1.1, April 2008 1-27
-
 1
1 -
2
-
3
-
4
-
5
-
6
-
7
-
8
-
9
-
10
-
11
-
12
-
13
-
14
-
15
-
16
-
17
-
18
-
19
-
20
-
21
-
22
-
23
-
24
-
25
-
26
-
27
-
28
-
29
-
30
-
31
-
32
-
33
-
 34
34 -
 35
35 -
 36
36 -
 37
37 -
 38
38 -
 39
39 -
 40
40 -
 41
41 -
 42
42 -
 43
43 -
 44
44 -
45
-
46
-
47
-
48
-
49
-
50
-
51
-
52
-
53
-
54
-
55
-
56
-
57
-
58
-
59
-
60
-
61
-
62
-
63
-
64
-
65
-
66
-
67
-
68
-
69
-
70
-
71
-
72
-
73
-
74
-
75
-
76
-
77
-
78
-
79
-
80
-
81
-
82
-
83
-
84
-
85
-
86
-
87
-
88
-
89
-
90
-
91
-
92
-
93
-
94
-
95
-
96
-
97
-
98
-
99
-
100
 |
 |