Netgear RND2150 RND2110 User Manual - Page 21
wilma, imhiswif, ourgroup, Manage Groups, Add Group, Apply - duo
 |
UPC - 606449056822
View all Netgear RND2150 manuals
Add to My Manuals
Save this manual to your list of manuals |
Page 21 highlights
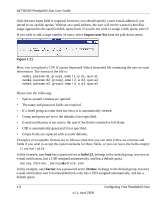
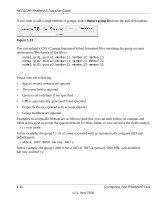
NETGEAR ReadyNAS Duo User Guide wilma,imhiswif,ourgroup,[email protected],225,50 In this example, user wilma has a password imhiswif, belongs to the group ourgroup, receives email notification sent to [email protected], has a UID set to 225, and a quota set to 50 MB. Managing Groups To add a new group: 1. Select Manage Groups from the drop-down menu in the upper right corner. 2. Select the Add Group tab if it is not already selected. You can add up to five groups at a time. If you expect to have just one big set of users for one group, you can forego adding a new group and accept the default users group. 3. Click Apply to save your settings. If you want, a user can belong to multiple groups. Once you have created user accounts, you can specify secondary groups that the user can belong to. This allows for finer-grain settings for share access. For instance, you can have user Smithy in the General group also belong to the Finance group so Smithy can access shares restricted to only the Finance Group. When adding a new group, you can specify the amount of disk space you wish to allocate that group by setting a disk quota. A value of 0 denotes no limit. You can also set the Group ID, or GID, of the group that you are adding. You can leave this field blank and let the system automatically assign this value unless you wish to match your GID to your NFS clients. Figure 1-12 After adding your groups, you can view or change your groups by clicking the alphabetical index tab, or click All to list all groups. Configuring Your ReadyNAS Duo 1-9 v1.1, April 2008
-
 1
1 -
2
-
3
-
4
-
5
-
6
-
7
-
8
-
9
-
10
-
11
-
12
-
13
-
14
-
15
-
 16
16 -
 17
17 -
 18
18 -
 19
19 -
 20
20 -
 21
21 -
 22
22 -
 23
23 -
 24
24 -
 25
25 -
 26
26 -
27
-
28
-
29
-
30
-
31
-
32
-
33
-
34
-
35
-
36
-
37
-
38
-
39
-
40
-
41
-
42
-
43
-
44
-
45
-
46
-
47
-
48
-
49
-
50
-
51
-
52
-
53
-
54
-
55
-
56
-
57
-
58
-
59
-
60
-
61
-
62
-
63
-
64
-
65
-
66
-
67
-
68
-
69
-
70
-
71
-
72
-
73
-
74
-
75
-
76
-
77
-
78
-
79
-
80
-
81
-
82
-
83
-
84
-
85
-
86
-
87
-
88
-
89
-
90
-
91
-
92
-
93
-
94
-
95
-
96
-
97
-
98
-
99
-
100
 |
 |