Netgear RND2150 RND2110 User Manual - Page 47
My Documents/My Pictures, Test Connection, rsync, Step 2 - Select Backup Destination
 |
UPC - 606449056822
View all Netgear RND2150 manuals
Add to My Manuals
Save this manual to your list of manuals |
Page 47 highlights
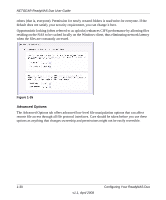
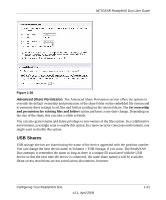
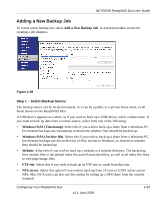
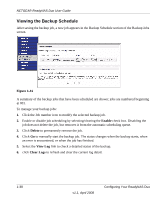
NETGEAR ReadyNAS Duo User Guide My Documents/My Pictures With a remote source, you might need to enter a login and password to access the share. If you are accessing a password-protected share on a remote ReadyNAS Duo server configured for Share security mode, enter the name of the share name for login. To make sure that you have proper access to the backup source, click Test Connection before continuing. Step 2 - Select Backup Destination The Step 2 process is almost identical to Step 1 except that you are now specifying the backup destination. If you selected a remote backup source, you need to select a public or a private home share on the ReadyNAS Duo (either the source or destination must be local to the ReadyNAS Duo). If you selected a ReadyNAS Duo share for the source, you can either enter another local ReadyNAS Duo share for the destination, or you can specify a remote backup destination. Figure 1-39 The remote backup destination can be a Windows PC/ReadyNAS Duo system, an NFS server, or a rsync server. Note that you can select rsync for a remote ReadyNAS Duo if it is configured to serve data over rsync. Step 3 - Choose Backup Schedule You can select a backup schedule as frequently as once every 4 hours daily or just once a week. The backup schedule is offset by 5 minutes from the hour to allow you to schedule snapshots on the hour (snapshots are almost instantaneous) and perform backups of those snapshots (see "USB Storage" on page 1-22 to set up a snapshot schedule). Configuring Your ReadyNAS Duo v1.1, April 2008 1-35
-
 1
1 -
2
-
3
-
4
-
5
-
6
-
7
-
8
-
9
-
10
-
11
-
12
-
13
-
14
-
15
-
16
-
17
-
18
-
19
-
20
-
21
-
22
-
23
-
24
-
25
-
26
-
27
-
28
-
29
-
30
-
31
-
32
-
33
-
34
-
35
-
36
-
37
-
38
-
39
-
40
-
41
-
 42
42 -
 43
43 -
 44
44 -
 45
45 -
 46
46 -
 47
47 -
 48
48 -
 49
49 -
 50
50 -
 51
51 -
 52
52 -
53
-
54
-
55
-
56
-
57
-
58
-
59
-
60
-
61
-
62
-
63
-
64
-
65
-
66
-
67
-
68
-
69
-
70
-
71
-
72
-
73
-
74
-
75
-
76
-
77
-
78
-
79
-
80
-
81
-
82
-
83
-
84
-
85
-
86
-
87
-
88
-
89
-
90
-
91
-
92
-
93
-
94
-
95
-
96
-
97
-
98
-
99
-
100
 |
 |
