Nextar Q4-04 User Guide - Page 39
Show/Hide POI Icons
 |
UPC - 714129880886
View all Nextar Q4-04 manuals
Add to My Manuals
Save this manual to your list of manuals |
Page 39 highlights
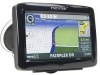
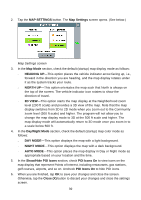
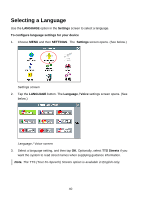
2. Tap the MAP SETTINGS button. The Map Settings screen opens. (See below.) Map Settings screen 3. In the Map Mode section, check the default (startup) map display mode as follows: - HEADING UP-This option places the vehicle indicator arrow facing up, i.e., forward in the direction you are heading, and the map display rotates under it as the system tracks your route. - NORTH UP-This option orientates the map such that North is always on the top of the screen. The vehicle indicator icon rotates to show the direction of travel. - 3D VIEW-This option starts the map display at the Neighborhood zoom level (200 ft scale) and provides a 3D view of the map. Note that the map display switches from 3D to 2D mode when you zoom out to the Community zoom level (500 ft scale) and higher. The program will not allow you to change the map display mode to 3D at the 500 ft scale and higher. The map display mode will automatically return to 3D mode once you zoom in to a scale below 500 ft. 4. In the Day/Night Mode section, check the default (startup) map color mode as follows: - DAY MODE-This option displays the map with a light background. - NIGHT MODE-This option displays the map with a dark background. - AUTO MODE-This option places the map display in Day or Night mode as appropriate based on your location and the time. 5. In the Show/Hide POI Icons section, check POI Icons On to view icons on the map display that represent Points of Interest, including restaurants, gas stations, golf courses, airports, and so on. Uncheck POI Icons On to hide POI icons. 6. When you are finished, tap OK to save your changes and close the screen. Otherwise, tap the Close (X) button to discard your changes and close the settings screen. 39
-
 1
1 -
2
-
3
-
4
-
5
-
6
-
7
-
8
-
9
-
10
-
11
-
12
-
13
-
14
-
15
-
16
-
17
-
18
-
19
-
20
-
21
-
22
-
23
-
24
-
25
-
26
-
27
-
28
-
29
-
30
-
31
-
32
-
33
-
 34
34 -
 35
35 -
 36
36 -
 37
37 -
 38
38 -
 39
39 -
 40
40 -
 41
41 -
 42
42 -
 43
43 -
 44
44 -
45
-
46
-
47
-
48
-
49
-
50
-
51
-
52
-
53
-
54
 |
 |