Nikon COOLPIX P510 User Manual - Page 188
Transferring Images from a Camera to a Computer, Notes on Power Source, Connecting the USB Cable
 |
View all Nikon COOLPIX P510 manuals
Add to My Manuals
Save this manual to your list of manuals |
Page 188 highlights
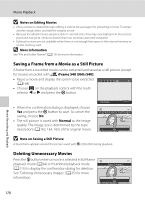
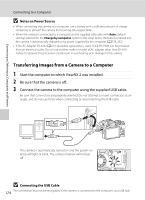
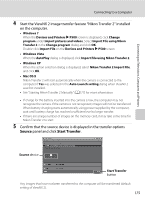
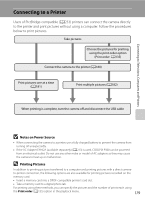
Connecting to Televisions, Computers and Printers Connecting to a Computer B Notes on Power Source • When connecting the camera to a computer, use a battery with a sufficient amount of charge remaining to prevent the camera from turning off unexpectedly. • When the camera is connected to a computer via the supplied USB cable with Auto (default setting) selected for the Charge by computer option in the setup menu, the battery inserted into the camera is automatically charged using power supplied by the computer (A178, 202). • If the AC Adapter EH-62A (A213) (available separately) is used, COOLPIX P500 can be powered from an electrical outlet. Do not use another make or model of AC adapter other than EH-62A. Failure to observe this precaution could result in overheating or in damage to the camera. Transferring Images from a Camera to a Computer 1 Start the computer to which ViewNX 2 was installed. 2 Be sure that the camera is off. 3 Connect the camera to the computer using the supplied USB cable. Be sure that connectors are properly oriented. Do not attempt to insert connectors at an angle, and do not use force when connecting or disconnecting the USB cable. The camera is automatically turned on and the power-on lamp will light or blink. The camera monitor will remain off. B Connecting the USB Cable 174 The connection may not be recognized if the camera is connected to the computer via a USB hub.
-
 1
1 -
2
-
3
-
4
-
5
-
6
-
7
-
8
-
9
-
10
-
11
-
12
-
13
-
14
-
15
-
16
-
17
-
18
-
19
-
20
-
21
-
22
-
23
-
24
-
25
-
26
-
27
-
28
-
29
-
30
-
31
-
32
-
33
-
34
-
35
-
36
-
37
-
38
-
39
-
40
-
41
-
42
-
43
-
44
-
45
-
46
-
47
-
48
-
49
-
50
-
51
-
52
-
53
-
54
-
55
-
56
-
57
-
58
-
59
-
60
-
61
-
62
-
63
-
64
-
65
-
66
-
67
-
68
-
69
-
70
-
71
-
72
-
73
-
74
-
75
-
76
-
77
-
78
-
79
-
80
-
81
-
82
-
83
-
84
-
85
-
86
-
87
-
88
-
89
-
90
-
91
-
92
-
93
-
94
-
95
-
96
-
97
-
98
-
99
-
100
-
101
-
102
-
103
-
104
-
105
-
106
-
107
-
108
-
109
-
110
-
111
-
112
-
113
-
114
-
115
-
116
-
117
-
118
-
119
-
120
-
121
-
122
-
123
-
124
-
125
-
126
-
127
-
128
-
129
-
130
-
131
-
132
-
133
-
134
-
135
-
136
-
137
-
138
-
139
-
140
-
141
-
142
-
143
-
144
-
145
-
146
-
147
-
148
-
149
-
150
-
151
-
152
-
153
-
154
-
155
-
156
-
157
-
158
-
159
-
160
-
161
-
162
-
163
-
164
-
165
-
166
-
167
-
168
-
169
-
170
-
171
-
172
-
173
-
174
-
175
-
176
-
177
-
178
-
179
-
180
-
181
-
182
-
 183
183 -
 184
184 -
 185
185 -
 186
186 -
 187
187 -
 188
188 -
 189
189 -
 190
190 -
 191
191 -
 192
192 -
 193
193 -
194
-
195
-
196
-
197
-
198
-
199
-
200
-
201
-
202
-
203
-
204
-
205
-
206
-
207
-
208
-
209
-
210
-
211
-
212
-
213
-
214
-
215
-
216
-
217
-
218
-
219
-
220
-
221
-
222
-
223
-
224
-
225
-
226
-
227
-
228
-
229
-
230
-
231
-
232
-
233
-
234
-
235
-
236
-
237
-
238
-
239
-
240
-
241
-
242
-
243
-
244
-
245
-
246
-
247
-
248
-
249
-
250
-
251
-
252
 |
 |