Nikon COOLPIX P510 User Manual - Page 199
Basic Camera Setup, Setup Menu - review
 |
View all Nikon COOLPIX P510 manuals
Add to My Manuals
Save this manual to your list of manuals |
Page 199 highlights
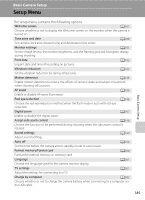
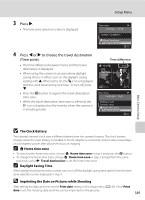
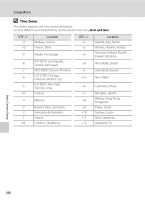
Basic Camera Setup Setup Menu Basic Camera Setup The setup menu contains the following options. Welcome screen A187 Choose whether or not to display the Welcome screen on the monitor when the camera is turned on. Time zone and date A188 Set camera clock and choose home and destination time zones. Monitor settings A191 Set the image review, the monitor brightness, and the framing grid and histogram display during shooting. Print date A192 Imprint date and time of recording on pictures. Vibration reduction A193 Set the vibration reduction for taking still pictures. Motion detection A195 Enable motion detection to reduce the effects of camera shake and subject movement when shooting still pictures. AF assist A196 Enable or disable AF-assist illuminator. Red-eye reduction A196 Choose the red-eye reduction method when the flash mode is auto with red-eye reduction. Digital zoom A197 Enable or disable the digital zoom. Assign side zoom control A198 Choose the function to be performed during shooting when the side zoom control is rotated. Sound settings A199 Adjust sound settings. Auto off A199 Set the time before the camera enters standby mode to save power. Format memory/Format card A200 Format the internal memory or memory card. Language A201 Choose the language used for the camera monitor display. TV settings A201 Adjust the settings for connecting to a TV. Charge by computer A202 Choose whether or not to charge the camera battery when connecting to a computer via the USB cable. 185
-
 1
1 -
2
-
3
-
4
-
5
-
6
-
7
-
8
-
9
-
10
-
11
-
12
-
13
-
14
-
15
-
16
-
17
-
18
-
19
-
20
-
21
-
22
-
23
-
24
-
25
-
26
-
27
-
28
-
29
-
30
-
31
-
32
-
33
-
34
-
35
-
36
-
37
-
38
-
39
-
40
-
41
-
42
-
43
-
44
-
45
-
46
-
47
-
48
-
49
-
50
-
51
-
52
-
53
-
54
-
55
-
56
-
57
-
58
-
59
-
60
-
61
-
62
-
63
-
64
-
65
-
66
-
67
-
68
-
69
-
70
-
71
-
72
-
73
-
74
-
75
-
76
-
77
-
78
-
79
-
80
-
81
-
82
-
83
-
84
-
85
-
86
-
87
-
88
-
89
-
90
-
91
-
92
-
93
-
94
-
95
-
96
-
97
-
98
-
99
-
100
-
101
-
102
-
103
-
104
-
105
-
106
-
107
-
108
-
109
-
110
-
111
-
112
-
113
-
114
-
115
-
116
-
117
-
118
-
119
-
120
-
121
-
122
-
123
-
124
-
125
-
126
-
127
-
128
-
129
-
130
-
131
-
132
-
133
-
134
-
135
-
136
-
137
-
138
-
139
-
140
-
141
-
142
-
143
-
144
-
145
-
146
-
147
-
148
-
149
-
150
-
151
-
152
-
153
-
154
-
155
-
156
-
157
-
158
-
159
-
160
-
161
-
162
-
163
-
164
-
165
-
166
-
167
-
168
-
169
-
170
-
171
-
172
-
173
-
174
-
175
-
176
-
177
-
178
-
179
-
180
-
181
-
182
-
183
-
184
-
185
-
186
-
187
-
188
-
189
-
190
-
191
-
192
-
193
-
 194
194 -
 195
195 -
 196
196 -
 197
197 -
 198
198 -
 199
199 -
 200
200 -
 201
201 -
 202
202 -
 203
203 -
 204
204 -
205
-
206
-
207
-
208
-
209
-
210
-
211
-
212
-
213
-
214
-
215
-
216
-
217
-
218
-
219
-
220
-
221
-
222
-
223
-
224
-
225
-
226
-
227
-
228
-
229
-
230
-
231
-
232
-
233
-
234
-
235
-
236
-
237
-
238
-
239
-
240
-
241
-
242
-
243
-
244
-
245
-
246
-
247
-
248
-
249
-
250
-
251
-
252
 |
 |
