Olympus D560 D-560 Zoom Reference Manual - English (6.6MB) - Page 44
Taking still pictures, Taking still pictures using the viewfinder
 |
UPC - 050332140714
View all Olympus D560 manuals
Add to My Manuals
Save this manual to your list of manuals |
Page 44 highlights
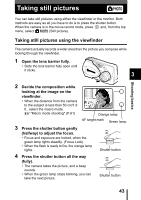
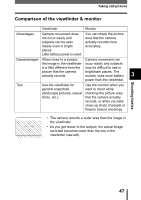
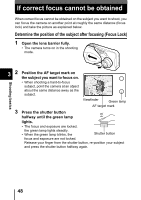
Shooting basics Taking still pictures You can take still pictures using either the viewfinder or the monitor. Both methods are easy as all you have to do is to press the shutter button. When the camera is in the movie record mode, press and, from the top menu, select (Still picture). Taking still pictures using the viewfinder The camera actually records a wider area than the picture you compose while looking through the viewfinder. 1 Open the lens barrier fully. • Slide the lens barrier fully open until it clicks. 3 2 Decide the composition while looking at the image on the viewfinder. • When the distance from the camera to the subject is less than 50 cm/1.6 ft., select the macro mode. "Macro mode shooting" (P.61) Orange lamp AF target mark Green lamp 3 Press the shutter button gently (halfway) to adjust the focus. • Focus and exposure are locked, when the green lamp lights steadily. (Focus Lock) • When the flash is ready to fire, the orange lamp lights. Shutter button 4 Press the shutter button all the way (fully). • The camera takes the picture, and a beep sounds. • When the green lamp stops blinking, you can take the next picture. Shutter button 43
-
 1
1 -
2
-
3
-
4
-
5
-
6
-
7
-
8
-
9
-
10
-
11
-
12
-
13
-
14
-
15
-
16
-
17
-
18
-
19
-
20
-
21
-
22
-
23
-
24
-
25
-
26
-
27
-
28
-
29
-
30
-
31
-
32
-
33
-
34
-
35
-
36
-
37
-
38
-
 39
39 -
 40
40 -
 41
41 -
 42
42 -
 43
43 -
 44
44 -
 45
45 -
 46
46 -
 47
47 -
 48
48 -
 49
49 -
50
-
51
-
52
-
53
-
54
-
55
-
56
-
57
-
58
-
59
-
60
-
61
-
62
-
63
-
64
-
65
-
66
-
67
-
68
-
69
-
70
-
71
-
72
-
73
-
74
-
75
-
76
-
77
-
78
-
79
-
80
-
81
-
82
-
83
-
84
-
85
-
86
-
87
-
88
-
89
-
90
-
91
-
92
-
93
-
94
-
95
-
96
-
97
-
98
-
99
-
100
-
101
-
102
-
103
-
104
-
105
-
106
-
107
-
108
-
109
-
110
-
111
-
112
-
113
-
114
-
115
-
116
-
117
-
118
-
119
-
120
-
121
-
122
-
123
-
124
-
125
-
126
-
127
-
128
-
129
-
130
-
131
-
132
-
133
-
134
-
135
-
136
-
137
-
138
-
139
-
140
-
141
-
142
-
143
-
144
-
145
-
146
-
147
-
148
-
149
-
150
-
151
-
152
-
153
-
154
-
155
-
156
-
157
-
158
-
159
-
160
-
161
-
162
-
163
-
164
-
165
-
166
-
167
-
168
-
169
-
170
-
171
 |
 |
