Olympus D560 D-560 Zoom Reference Manual - English (6.6MB) - Page 96
Select the last frame of the index., Press, to select OK, and, the procedure from Step 5.
 |
UPC - 050332140714
View all Olympus D560 manuals
Add to My Manuals
Save this manual to your list of manuals |
Page 96 highlights
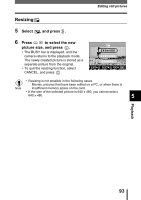
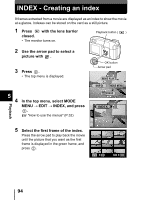
INDEX - Creating an index 6 Select the last frame of the index. As in Step 5, press the arrow pad to play OK back the movie until the picture that you want as the last frame is displayed in the green frame, and press . 7 Press to select OK, and press . INDEX • The 9 frames extracted from the movie OK appear as an index display, and the RESEt camera returns to the playback mode. The index is stored as a new picture. CANCEL • If you want to select the frames again, SELECt GO select RESET and press and repeat the procedure from Step 5. • To cancel the index function, select CANCEL and press . TIPS 5 • The index is stored as a still picture in a different record mode from the original movie. Record mode when the movie is shot HQ SQ Record mode when stored as an index SQ1 (1024 x 768 pixels) SQ2 (640 x 480 pixels) • The interval between the frames that are automatically picked out varies depending on the recording time of the movie. Note • An index consists of 9 frames. • You cannot create an index if there is insufficient memory space on the card. Playback 95
-
 1
1 -
2
-
3
-
4
-
5
-
6
-
7
-
8
-
9
-
10
-
11
-
12
-
13
-
14
-
15
-
16
-
17
-
18
-
19
-
20
-
21
-
22
-
23
-
24
-
25
-
26
-
27
-
28
-
29
-
30
-
31
-
32
-
33
-
34
-
35
-
36
-
37
-
38
-
39
-
40
-
41
-
42
-
43
-
44
-
45
-
46
-
47
-
48
-
49
-
50
-
51
-
52
-
53
-
54
-
55
-
56
-
57
-
58
-
59
-
60
-
61
-
62
-
63
-
64
-
65
-
66
-
67
-
68
-
69
-
70
-
71
-
72
-
73
-
74
-
75
-
76
-
77
-
78
-
79
-
80
-
81
-
82
-
83
-
84
-
85
-
86
-
87
-
88
-
89
-
90
-
 91
91 -
 92
92 -
 93
93 -
 94
94 -
 95
95 -
 96
96 -
 97
97 -
 98
98 -
 99
99 -
 100
100 -
 101
101 -
102
-
103
-
104
-
105
-
106
-
107
-
108
-
109
-
110
-
111
-
112
-
113
-
114
-
115
-
116
-
117
-
118
-
119
-
120
-
121
-
122
-
123
-
124
-
125
-
126
-
127
-
128
-
129
-
130
-
131
-
132
-
133
-
134
-
135
-
136
-
137
-
138
-
139
-
140
-
141
-
142
-
143
-
144
-
145
-
146
-
147
-
148
-
149
-
150
-
151
-
152
-
153
-
154
-
155
-
156
-
157
-
158
-
159
-
160
-
161
-
162
-
163
-
164
-
165
-
166
-
167
-
168
-
169
-
170
-
171
 |
 |
