Olympus D560 D-560 Zoom Reference Manual - English (6.6MB) - Page 77
Adjusting the white balance
 |
UPC - 050332140714
View all Olympus D560 manuals
Add to My Manuals
Save this manual to your list of manuals |
Page 77 highlights
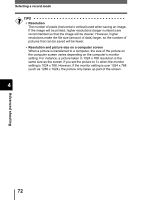
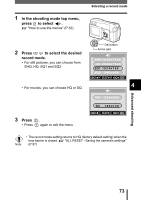
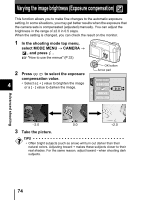
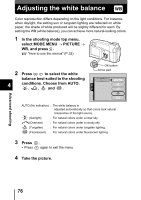
Adjusting the white balance Color reproduction differs depending on the light conditions. For instance, when daylight, the setting sun or tungsten lighting are reflected on white paper, the shade of white produced will be slightly different for each. By setting the WB (white balance), you can achieve more natural-looking colors. 1 In the shooting mode top menu, select MODE MENU o PICTURE o WB, and press . "How to use the menus" (P.32) 2 Press to select the white balance best suited to the shooting 4 conditions. Choose from AUTO, , , and . OK button Arrow pad Advanced shooting AUTO (No indication) : The white balance is adjusted automatically so that colors look natural irrespective of the light source. (Sunlight) : For natural colors under a clear sky. (Overcast) : For natural colors under a cloudy sky. (Tungsten) : For natural colors under tungsten lighting. (Fluorescent) : For natural colors under fluorescent lighting. 3 Press . • Press again to exit the menu. 4 Take the picture. 76
-
 1
1 -
2
-
3
-
4
-
5
-
6
-
7
-
8
-
9
-
10
-
11
-
12
-
13
-
14
-
15
-
16
-
17
-
18
-
19
-
20
-
21
-
22
-
23
-
24
-
25
-
26
-
27
-
28
-
29
-
30
-
31
-
32
-
33
-
34
-
35
-
36
-
37
-
38
-
39
-
40
-
41
-
42
-
43
-
44
-
45
-
46
-
47
-
48
-
49
-
50
-
51
-
52
-
53
-
54
-
55
-
56
-
57
-
58
-
59
-
60
-
61
-
62
-
63
-
64
-
65
-
66
-
67
-
68
-
69
-
70
-
71
-
 72
72 -
 73
73 -
 74
74 -
 75
75 -
 76
76 -
 77
77 -
 78
78 -
 79
79 -
 80
80 -
 81
81 -
 82
82 -
83
-
84
-
85
-
86
-
87
-
88
-
89
-
90
-
91
-
92
-
93
-
94
-
95
-
96
-
97
-
98
-
99
-
100
-
101
-
102
-
103
-
104
-
105
-
106
-
107
-
108
-
109
-
110
-
111
-
112
-
113
-
114
-
115
-
116
-
117
-
118
-
119
-
120
-
121
-
122
-
123
-
124
-
125
-
126
-
127
-
128
-
129
-
130
-
131
-
132
-
133
-
134
-
135
-
136
-
137
-
138
-
139
-
140
-
141
-
142
-
143
-
144
-
145
-
146
-
147
-
148
-
149
-
150
-
151
-
152
-
153
-
154
-
155
-
156
-
157
-
158
-
159
-
160
-
161
-
162
-
163
-
164
-
165
-
166
-
167
-
168
-
169
-
170
-
171
 |
 |
