Panasonic AG-HMX100 Operating Instructions - Page 23
Changing Direct Patterns [DIRECT PATTERN
 |
View all Panasonic AG-HMX100 manuals
Add to My Manuals
Save this manual to your list of manuals |
Page 23 highlights
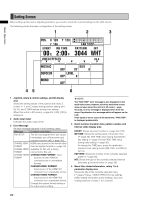
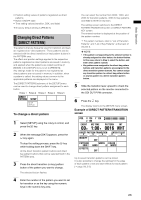
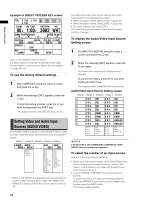
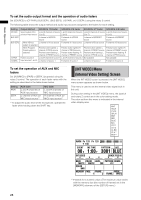
Basic Operation • Position setting values of patterns registered as direct patterns • Button ON/OFF state • Time setting values (transition, DSK, and fade) The factory default setting is [PRESET]. Changing Direct Patterns [DIRECT PATTERN] The patterns that are frequently used for transition and keys are registered as "direct patterns." These patterns can be selected with the direct transition (or key) pattern buttons in the PATTERN area. The effect and position settings applied to the respective patterns registered as direct patterns are saved in memory and applied when the patterns are called next time (if [MODE] in the [SETUP] menu is set to [PRESET]). Any settings made for the patterns not registered as direct patterns are not saved in memory. In addition, when a pattern is called, the setting values common to the applicable patterns are displayed in the menu. The [DIRECT PATTERN] submenu of the [SETUP] menu can be used to change direct pattern assignment to each button. Rotary 1 Rotary 2 Rotary 3 Rotary 4 Rotary 5 DIRECT PATTERN SETUP SETUP DEFAULT To change a direct pattern 1 Select [SETUP] using the rotary 2 control, and press the key. 2 When the message [OK?] appears, press the key again. To stop the setting process, press the key while holding down the SHIFT key. All the direct transition pattern buttons and direct key pattern buttons that can be selected flash in the PATTERN area. 3 Press the direct transition (or key) pattern button of the pattern you want to change. The selected button flashes. You can select the number from 0XXX, 1XXX, and 2XXX for transition patterns, 3XXX for key patterns, and 9000 to 9019 for key learn. The setting screen switches to the DIRECT PATTERN TRANSITION screen or DIRECT PATTERN KEY screen. The entered number is displayed at the position of the pattern number. For pattern numbers, refer to "List of Transition Patterns" and "List of Key Patterns" at the back of Volume 2. NOTE • If the pattern corresponding to the entered number is already assigned to other button, the button flashes. In this case, return to Step 3, select the button, and enter other pattern number. • Key patterns are assigned to the direct key pattern buttons and transition patterns are assigned to the direct transition pattern buttons. You cannot assign any transition pattern to a direct key pattern button or any key pattern to a direct transition pattern button. 5 Slide the transition lever upward to check the selected pattern on the monitor connected to the SDI OUT PVW connector. 6 Press the key. The display returns to the [SETUP] menu screen. Example of DIRECT PATTERN TRANSITION screen POS. X 128 Y 128 Z 196 EVENT ME TIME PATTERN INT 00 E 1:00 F 0016 WHT DIRECT PATTERN TRANSITION ENTER TO EXIT MODIFY PATTERN EDGE EFFECTS OFF WIDTH COLOR HARD 0 WHITE OFF Up to seven transition patterns can be stored. It is also possible to change the settings for the edge of each pattern or set and store effects for each pattern ( page Vol.2-3). 4 Enter the number of the pattern you want to set for transition or as the key using the numeric keys in the numeric key area. 23
-
 1
1 -
2
-
3
-
4
-
5
-
6
-
7
-
8
-
9
-
10
-
11
-
12
-
13
-
14
-
15
-
16
-
17
-
 18
18 -
 19
19 -
 20
20 -
 21
21 -
 22
22 -
 23
23 -
 24
24 -
 25
25 -
 26
26 -
 27
27 -
 28
28 -
29
-
30
-
31
-
32
-
33
-
34
-
35
-
36
-
37
-
38
-
39
-
40
-
41
-
42
-
43
-
44
-
45
-
46
-
47
-
48
 |
 |
