Panasonic AG-HMX100 Operating Instructions - Page 31
To save still pictures used as internal, video, To save movies used as internal video
 |
View all Panasonic AG-HMX100 manuals
Add to My Manuals
Save this manual to your list of manuals |
Page 31 highlights
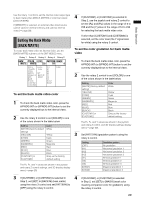
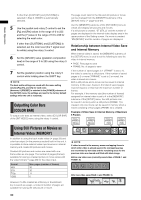
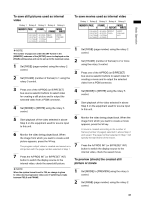
Basic Operation To save still pictures used as internal video Rotary 1 Rotary 2 Rotary 3 Rotary 4 Rotary 5 MEMORY PAGE FRAME MODE 1 1 FRAME WRITE 1-30 (480i) 1-30 (480i) FIELD 1-30 (576i) 1-30 (576i) FRAME 1-14 (720p) 1-14 (720p) 1-6 (1080i) 1-6 (1080i) WRITE PREVIEW EXIT To save movies used as internal video Rotary 1 Rotary 2 Rotary 3 Rotary 4 Rotary 5 MEMORY PAGE FRAME MODE 1 2 REPEAT WRITE 1-30 (480i) 1-30 (480i) REPEAT 1-30 (576i) 1-30 (576i) ONCE 1-14 (720p) 1-14 (720p) 1-6 (1080i) 1-6 (1080i) WRITE PREVIEW EXIT NOTE The number of pages set under the [INT V] item in the [MEMORY] submenu of the [SETUP] menu is displayed as the [PAGE] setting value and can be set up to the maximum value. 1 Set [PAGE] (page number) using the rotary 2 control. 2 Set [FRAME] (number of frames) to 1 using the rotary 3 control. 1 Set [PAGE] (page number) using the rotary 2 control. 2 Set [FRAME] (number of frames) to 2 or more using the rotary 3 control. 3 Press one of the A/PROG (or B/PRESET) bus source selector buttons to select video for creating a movie and to output the selected video from a PGM connector. 3 Press one of the A/PROG (or B/PRESET) bus source selector buttons to select video for creating a still picture and to output the selected video from a PGM connector. 4 Set [MODE] to [WRITE] using the rotary 5 control. 4 Set [MODE] to [WRITE] using the rotary 5 control. 5 Start playback of the video selected in above Step 3 on the equipment used for source input to this unit. 5 Start playback of the video selected in above Step 3 on the equipment used for source input to this unit. 6 Monitor the video being played back. When the image from which you want to create a still 6 Monitor the video being played back. When the image from which you want to create a movie appears, press the key. A movie is created according to the number of frames (number of pages) selected in above Step 2 and saved. The page number selected in Step 1 will specify the start frame of the movie. picture appears, press the key. 7 The program output video is created and saved as a Press the A/PROG INT (or B/PRESET INT) still picture with the page number selected in Step 1. button to switch the display source to the internal video, check the saved movie. 7 Press the A/PROG INT (or B/PRESET INT) button to switch the display source to the internal video, check the saved still picture. To preview (check) the created still picture or movie NOTE When the system format is set to 720, no change is given to video due to progressive video even if switching is made between FIELD and FRAME. 1 Set [MODE] to [PREVIEW] using the rotary 5 control. 2 Set [PAGE] (page number) using the rotary 2 control. 31
-
 1
1 -
2
-
3
-
4
-
5
-
6
-
7
-
8
-
9
-
10
-
11
-
12
-
13
-
14
-
15
-
16
-
17
-
18
-
19
-
20
-
21
-
22
-
23
-
24
-
25
-
 26
26 -
 27
27 -
 28
28 -
 29
29 -
 30
30 -
 31
31 -
 32
32 -
 33
33 -
 34
34 -
 35
35 -
 36
36 -
37
-
38
-
39
-
40
-
41
-
42
-
43
-
44
-
45
-
46
-
47
-
48
 |
 |
