Panasonic AG-HMX100 Operating Instructions - Page 35
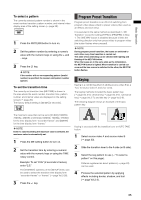
Program Preset Transition, Keying, To select a pattern, To set the transition time
 |
View all Panasonic AG-HMX100 manuals
Add to My Manuals
Save this manual to your list of manuals |
Page 35 highlights
Basic Operation To select a pattern The currently selected pattern number is shown in the event number, transition, pattern number, and internal video display area of the setting screen ( page 20). PATTERN 0001 1 Press the PATTERN button to turn on. 2 Set the pattern number by entering a numeric value with the numeric keys or using the + and − keys. 3 Press the key. NOTE If the number with no corresponding pattern (invalid number) is specified, the nearest valid pattern number appears. To set the transition time The currently set transition time (ME TIME) is shown in the area where the event number, transition time, pattern number, and internal video are displayed on the setting screen ( page 20). The factory default setting is [02:00f] [2 seconds]. ME TIME 02:00F Program Preset Transition Program preset transition is an effect of switching from program video (base video) to preset video (video used as an effect), and vice versa. It is executed in the same method as described in "AB Transition" except for setting [TYPE] to [PRG/PRE] in Step 1. The ONE WAY button is disabled because it limits the switching direction only from preset video to program video (the button flashes when pressed). NOTE During program preset transition, the buses are switched to each other every time transition is carried out. This state of bus switching can be checked with lighting and flashing of the ME PVW button. When the buses are in the same state as the initialization, the ME PVW button is lighted. When transition is carried out once and the bus source is switched to the other, the ME PVW button flashes. Keying Keying is a combining effect of adding source video B as a "key" to source video A, and vice versa. The keying methods included the basic pattern key ( page Vol.2-5), chroma key ( page Vol.2-6) , luminance key ( page Vol.2-7), and title key ( page Vol.2-8). The following diagram shows an example of the basic pattern key. The maximum value that can be set is [33:09f] (1080/59i, 720/59p, 480/59i) or [39:24f] (1080/50i, 720/50p, 576/50i) for the time display form "seconds+frames" and [00999f] for the time display form "frames." NOTE Even if a value exceeding the maximum value is selected, the maximum value is automatically set. 1 Press the ME setting button to turn on. 2 Set the transition time by entering a numeric value with the numeric keys or using the TIME rotary control. Example: To set "2:05" (2 seconds 5 frames), enter "2.5." The [SYSTEM1] submenu of the [SETUP] menu can be used to select the transition time display form "seconds+frames" or "frames" ( page Vol.2-26). 3 Press the key. Keying is executed with the transition lever or AUTO TAKE button. 1 Select source video A and source video B ( page 33). 2 Slide the transition lever to the A side (or B side). 3 Select the key pattern to use ( "To select a pattern" on this page). Patterns registered as direct patterns ( page 23) can be used. 4 Process the selected pattern by applying effects including border, shadow, and trail ( page Vol.2-3). 35
-
 1
1 -
2
-
3
-
4
-
5
-
6
-
7
-
8
-
9
-
10
-
11
-
12
-
13
-
14
-
15
-
16
-
17
-
18
-
19
-
20
-
21
-
22
-
23
-
24
-
25
-
26
-
27
-
28
-
29
-
 30
30 -
 31
31 -
 32
32 -
 33
33 -
 34
34 -
 35
35 -
 36
36 -
 37
37 -
 38
38 -
 39
39 -
 40
40 -
41
-
42
-
43
-
44
-
45
-
46
-
47
-
48
 |
 |
