Panasonic AG-HMX100 Operating Instructions - Page 34
AB Transition, To temporarily stop auto transition, To limit the transition to one direction
 |
View all Panasonic AG-HMX100 manuals
Add to My Manuals
Save this manual to your list of manuals |
Page 34 highlights
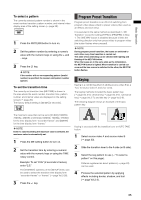
Basic Operation NOTE If the AUDIO FOLLOW VIDEO button has been pressed to turn on to interlock the audio faders with the transition lever or the audio level of input source 5 to 8 has been adjusted with the SHIFT key pressed, the audio fader settings may not match the actual audio level. In such a case, the audio level is adjusted as follows according to the operation of the audio faders: • When the audio fader is moved in the direction in which a difference with the actual audio level decreases, the audio level does not change until the fader position matches the actual audio level. • When the audio fader is moved in the direction in which a difference with the actual audio level increases, the audio level changes according to the fader position. • The audio level adjusted by the MASTER fader changes according to the fader position. AB Transition AB transition is an effect of switching from source video A to source video B, and vice versa. There are two methods of video switching: "wipe" and "mix." • Transition wipe Source video B (or A) appears by wiping out source video A (or B). • Transition mix Source video B (or A) appears by overlapping source video A (or B). The following diagram shows an example of transition wipe. Transition is executed with the transition lever or the AUTO TAKE button. 1 Set [TYPE] to [AB] in the [BUS] submenu of the [SETUP] menu ( page 27). 2 Select source video A and source video B ( page 33). 3 Slide the transition lever to the A side (or B side). 4 Select the transition pattern to use ( "To select a pattern" on page 35). Patterns registered as direct patterns ( page 23) can be used. 5 Process the selected pattern by applying effects including border, shadow, and trail ( page Vol.2-3). 6 Set the pattern position (transition start position) using the joystick. Press the CENTER button to turn on, and the pattern position is set to the center. Press the HOLD button to turn on, and the joystick is fixed to the current position. NOTE • There are some patterns for which the position cannot be adjusted with the joystick. For more information, refer to "List of Transition Patterns" at the back of Volume 2. • For the patterns registered as direct patterns, the settings of the effects or position applied to each pattern are saved in memory and applied when the pattern is called next time (if [MODE] in the [SETUP] menu is set to [PRESET]). Any settings made for the patterns not registered as direct patterns are not saved in memory. 7 Set the transition time (from switching start to end) ( "To set the transition time" on page 35). 8 Slide the transition lever to the B side (or A side) or press the AUTO TAKE button. When the AUTO TAKE button is pressed, it is lighted and the source video switching is automatically executed (auto transition) from A to B (or B to A). To temporarily stop auto transition Press the AUTO TAKE button again. This button flashes and the video switching is paused. When the button is pressed again, it is lighted and the switching is resumed. To limit the transition to one direction When the ONE WAY button is pressed to turn on in the PATTERN area, the transition goes in the same direction regardless of the direction in which the transition lever is moved. (No transition is reversed.) However, if a transition pattern which is not reversed intrinsically is selected, the ONE WAY button flashes when it is pressed. To synchronize the audio faders to the transition lever Press the AUDIO FOLLOW VIDEO button to turn on. 34
-
 1
1 -
2
-
3
-
4
-
5
-
6
-
7
-
8
-
9
-
10
-
11
-
12
-
13
-
14
-
15
-
16
-
17
-
18
-
19
-
20
-
21
-
22
-
23
-
24
-
25
-
26
-
27
-
28
-
 29
29 -
 30
30 -
 31
31 -
 32
32 -
 33
33 -
 34
34 -
 35
35 -
 36
36 -
 37
37 -
 38
38 -
 39
39 -
40
-
41
-
42
-
43
-
44
-
45
-
46
-
47
-
48
 |
 |
