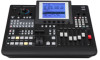
Panasonic AG-HMX100 Operating Instructions - Page 37
To execute DSK, To set the DSK transition time, To use a transition pattern as DSK
 |
View all Panasonic AG-HMX100 manuals
Add to My Manuals
Save this manual to your list of manuals |
Page 37 highlights
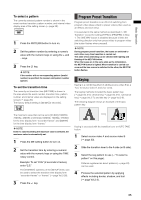
Basic Operation The following figure shows an example connection of source equipment, PC, and this unit. P2 mobile Professional-use camera SDI (video and audio) input SDI IN 3 SDI IN 4 AG-HMX100P/HMX100E DVI-I IN DVI-I input HMX100 PC To execute DSK DSK is executed with the DSK execution button. 1 Confirm that the DSK execution button is off. 2 Select the video connector to which input video used for the key source to be inserted and for the key fill fit in the key is output ( page Vol.2‑11). 3 Press the DSK selector button. You can preview output video to which the DSK is inserted. 4 Set the detection level of the key video by changing slice or slope setting ( page Vol.2‑6). 5 Set the DSK transition time (from insertion start to end) ( "To set the DSK transition time" on this page). 6 Press the DSK execution button. The button is lighted, and flashes while the key is being inserted. To use a transition pattern as DSK Press the DSK EFFECTS button to turn on and select a transition pattern instead of selecting preset video ( page 35). The dissolve effect is applied. NOTE It is impossible to use a pattern other than transition patterns for DSK. If a pattern unavailable for DSK is selected, the DSK EFFECTS button flashes. To set the DSK transition time The currently set DSK transition time (DSK TIME) is shown in the area where the event number, transition time, pattern number, and internal video are displayed on the setting screen ( page 20). The factory default setting is [02:00f] (2 seconds). 1 Press the DSK setting button to turn on. 2 Set the DSK transition time by entering a numeric value with the numeric keys or using the TIME rotary control. Example: To set "2:05" (2 seconds 5 frames), enter "2.5." The [SYSTEM1] submenu of the [SETUP] menu can be used to select the transition time display form "seconds+frames" or "frames" ( page Vol.2-26). 3 Press the key. 37
-
 1
1 -
2
-
3
-
4
-
5
-
6
-
7
-
8
-
9
-
10
-
11
-
12
-
13
-
14
-
15
-
16
-
17
-
18
-
19
-
20
-
21
-
22
-
23
-
24
-
25
-
26
-
27
-
28
-
29
-
30
-
31
-
 32
32 -
 33
33 -
 34
34 -
 35
35 -
 36
36 -
 37
37 -
 38
38 -
 39
39 -
 40
40 -
 41
41 -
 42
42 -
43
-
44
-
45
-
46
-
47
-
48
 |
 |
