Panasonic AG-HMX100 Operating Instructions - Page 25
To set the video and audio input sources, To associate video input with audio input - hdmi input
 |
View all Panasonic AG-HMX100 manuals
Add to My Manuals
Save this manual to your list of manuals |
Page 25 highlights
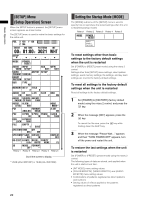
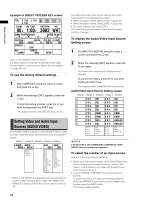
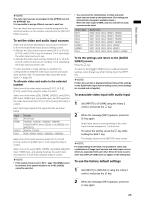
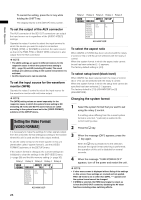
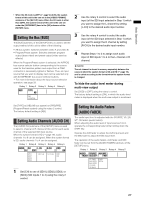
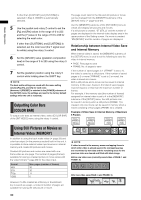
Basic Operation NOTE The same input sources are assigned to the A/PROG bus and the B/PRESET bus. It is impossible to assign different sources to each bus. You can check the input source currently assigned to the selected number on the monitor connected to the SDI OUT PVW connector. To set the video and audio input sources Video and sound are allocated to input source numbers 1 to 8 on the Audio/Video Input Source Setting screen. • Allocate the video input sources named [V S-1], [V S-2], [V S-3], and [V S-4] to any of numbers 1 to 8, specifying the video input sources to use. • Allocate the audio input sources named [A S-1], [A S-2], [A S-3], and [A S-4] to any of numbers 1 to 8, specifying the audio input sources to use. It is also possible to make settings to establish the correspondence between video input sources and audio input sources. See "To associate video input with audio input" ( page 25). To allocate video and audio to the selected number Select one of the video input sources [V S-1], [V S-2], [V S-3], and [V S-4] using the rotary 2 control. Select one of the video [SDI], [HDMI], [VIDEO], and [DVI-I] (SDI input, HDMI input, composite input, and DVI input) as the video input sources [V S-1] to [V S-4] using the rotary 3 control. Each input type supports the signal formats as shown below. Input SDI HDMI VIDEO DVI-I Format All formats 720/50p, 720/59p, 1080/50i, 1080/59i, 1080/23.98PsF (when [3D]is set to [MODE1] or [MODE2]) 480/59i, 576/50i XGA, WXGA, SXGA, 1080/50p, 1080/60p Select one of the audio input sources [A S-1], [A S-2], [A S-3], and [A S-4] (SDI input 1 to 4) using the rotary 4 control. Select one of the audio [SDI], [HDMI], and [ANALOG] (SDI input, HDMI input, and analog input) as the audio input sources [A S-1] to [A S-4] using the rotary 5 control. NOTE • If the system format is set to SD ( page 19), [HDMI] cannot be selected. If the system format is set to HD, [VIDEO] cannot be selected. • You cannot set the combinations of video and audio input sources shown in the table below. (The settings are automatically changed to available values.) When the video input is HDMI, only two channels of audio sources can be input. Video Input SDI1 SDI2 SDI3 SDI4 HDMI1 HDMI2 DVI-I Audio Input SDI2, SDI3, SDI4, HDMI1, HDMI2 SDI1, SDI3, SDI4, HDMI1, HDMI2 SDI1, SDI2, SDI4, HDMI1, HDMI2 SDI1, SDI2, SDI3, HDMI1, HDMI2 SDI1, SDI2, SDI3, SDI4, HDMI2 SDI1, SDI2, SDI3, SDI4, HDMI1 SDI1, SDI2, SDI3, SDI4, HDMI1, HDMI2 To fix the settings and return to the [AUDIO VIDEO] screen Press the key. To return to the [AUDIO VIDEO] screen without fixing the settings, press the key while holding down the SHIFT key. NOTE If other menu screen is displayed without fixing of the settings on the Audio/Video Input Source Setting screen, those settings are revoked and not applied. To associate video input with audio input 1 Set [INPUT] to [V-LINK] using the rotary 2 control, and press the key. 2 When the message [OK?] appears, press the key again. Audio input sources corresponding to the video input sources assigned to 1 to 8 are set. To cancel the setting, press the key while holding the SHIFT key. The display returns to the [SETUP] menu screen. NOTE For input settings in 3D mode, it is possible to select only combinations of image input sources and audio input sources which are associated with each other. When 3D mode is set to other than [OFF], [V-LINK] does not appear as the setting item. To use the factory default settings 1 Set [INPUT] to [DEFAULT] using the rotary 2 control, and press the key. 2 When the message [OK?] appears, press the key again. 25
-
 1
1 -
2
-
3
-
4
-
5
-
6
-
7
-
8
-
9
-
10
-
11
-
12
-
13
-
14
-
15
-
16
-
17
-
18
-
19
-
 20
20 -
 21
21 -
 22
22 -
 23
23 -
 24
24 -
 25
25 -
 26
26 -
 27
27 -
 28
28 -
 29
29 -
 30
30 -
31
-
32
-
33
-
34
-
35
-
36
-
37
-
38
-
39
-
40
-
41
-
42
-
43
-
44
-
45
-
46
-
47
-
48
 |
 |