Panasonic AG-HMX100 Operating Instructions-Advanced - Page 13
Adjusting Input Video, Adjusting Colors of Video [COLOR EFFECTS]
 |
View all Panasonic AG-HMX100 manuals
Add to My Manuals
Save this manual to your list of manuals |
Page 13 highlights
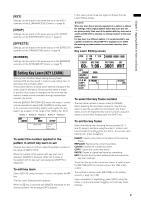
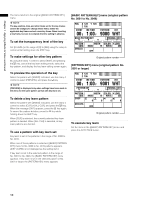
Chapter 1 Applying Effects to Video and Sound Adjusting Input Video Adjusting Colors of Video [COLOR EFFECTS] The [COLOR EFFECTS] menu is used to make settings for applying effects to the colors of video for each bus. The color effects to video can be set including color balance and brightness adjustment. NOTE The color effect and MONO (monochrome) effect cannot be used at the same time. The color effect cannot be applied to the video to which MONO has been applied as the video effect. [COLOR EFFECTS] menu The menu appears when the A/PROG COLOR EFFECTS or B/PRESET COLOR EFFECTS button is pressed to turn on. The color effects set currently are applied at the same time. To display the menu without applying the effects, press either COLOR EFFECTS button while holding down the SHIFT key. When the preview output is executed, switching is automatically performed between video A and video B according to the pressed button. COLOR PB 128 PR 128 C GAIN 0 EVENT ME TIME 00 E 1:00 F PATTERN 3001 INT BLUE To set the color saturation to 0 temporarily Press the CENTER button during operation of the [COLOR EFFECTS] menu, the color saturation can be set to zero temporarily. NOTE • If the No. 221 or 222 (1068 or 1069) pattern is selected, the MIX pattern with the color effects applied is set, the COLOR EFFECT button is lighted, and the [COLOR EFFECTS] menu appears. • No color effects can be applied to internal video. Applying Effects to Video [VIDEO EFFECTS] The [VIDEO EFFECTS] menu is used to apply changes to video or video switching effect for each bus. Special video effects such as mosaic and paint can be set in this menu. NOTE • No video effects can be applied to internal video. • Only one choice can be made from multi-strobe, decay, trail, and shadow. The effect selected last has priority, and the previously selected effect is canceled. • Decay cannot be set to ON for both A/PROG and B/PRESET at the same time. The setting made last has priority and the other made earlier is turned OFF. • Only one choice can be made from multi-strobe and mosaic. The effect selected last has priority, and the previously selected effect is canceled. COLOR EFFECTS CH A Y SETUP Y GAIN PB PR C GAIN 0 0 128 128 0 Set [Y SETUP] (Y signal setup) in the range of [-128] to [+127] using the rotary 1 control. The factory default setting is [0]. Set [Y GAIN] (Y signal gain) in the range of [-128] to [+127] using the rotary 2 control (0 dB=0). The factory default setting is [0]. To adjust the color balance, adjust [PB] and [PR]. Use the rotary 3 (for X direction) and rotary 4 (for Y direction) controls or operate the joystick in the X and Y directions. Set [C GAIN] (chroma gain) using the rotary 5 control or rotary Z control. At that time, the joystick, rotary Z control settings, and 3D display area of the setting screen ( page Vol.1-20) shows the PB, PR, and C GAIN values. [VIDEO EFFECTS] menu The menu appears when the A/PROG VIDEO EFFECTS or B/PRESET VIDEO EFFECTS button is pressed to turn on. The video effects set currently are applied at the same time. To display the menu without applying the effects, press either VIDEO EFFECTS button while holding down the SHIFT key. When the preview output is executed, switching is automatically performed between video A and video B according to the pressed button. 13
-
 1
1 -
2
-
3
-
4
-
5
-
6
-
7
-
 8
8 -
 9
9 -
 10
10 -
 11
11 -
 12
12 -
 13
13 -
 14
14 -
 15
15 -
 16
16 -
 17
17 -
 18
18 -
19
-
20
-
21
-
22
-
23
-
24
-
25
-
26
-
27
-
28
-
29
-
30
-
31
-
32
-
33
-
34
-
35
-
36
-
37
 |
 |
