Panasonic AG-HMX100 Operating Instructions-Advanced - Page 4
PATTERN EDGE], EFFECTS], If [SHADOW] is selected
 |
View all Panasonic AG-HMX100 manuals
Add to My Manuals
Save this manual to your list of manuals |
Page 4 highlights
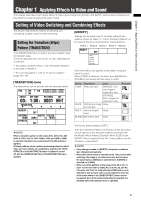
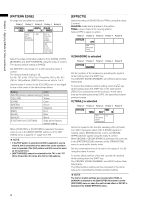
Chapter 1 Applying Effects to Video and Sound [PATTERN EDGE] An edge can be added to a pattern. Rotary 1 Rotary 2 Rotary 3 Rotary 4 Rotary 5 PATTERN WIDTH COLOR EDGE HARD 32 WHITE HARD 1-255 SOFT BORDER SOFT BORDER WHITE YELLOW CYAN GREEN MAGENTA RED BLUE BLACK CUSTOM1 CUSTOM2 Select the edge of transition patterns from [HARD], [SOFT], [BORDER], and [SOFT BORDER] using the rotary 2 control. The factory default setting is [HARD]. Set [WIDTH] in the range of 1 to 255 using the rotary 3 control. The factory default setting is 32. For No. 701 to No. 707 (24 to 27) and No. 801 to No. 814 (183 to 196) patterns, [WIDTH] can be set only to 1 or 2. Use the rotary 4 control to set [COLOR] (color of the edge) to one of the colors in the table shown below. Setting [WHITE] (factory default setting) [YELLOW] [CYAN] [GREEN] [MAGENTA] [RED] [BLUE] [BLACK] [CUSTOM1] or [CUSTOM2] Color White Yellow Cyan Green Magenta Red Blue Black Grey as the factory default setting When [CUSTOM1] or [CUSTOM2] is selected, the same color as set in the [BACK MATTE] submenu of the [INT VIDEO] menu is applied ( page Vol.1-29). NOTE • If the PinP pattern is selected and Still is applied to source video B, Still is cancelled at the same time as the transition lever is operated. (The PinP pattern and Still cannot be used as the same time.) • [SOFT BORDER] cannot be selected for No. 701 to No. 707 (24 to 27) and No. 801 to No. 814 (183 to 196) patterns. [EFFECTS] Select the effect of [SHADOW] or [TRAIL] using the rotary 2 control. SHADOW: Adds black shadow to the pattern. TRAIL: Leaves trails of the moving pattern. Select [OFF] to apply no effect. Rotary 1 Rotary 2 Rotary 3 Rotary 4 Rotary 5 EFFECTS OFF OFF SHADOW TRAIL If [SHADOW] is selected Rotary 1 Rotary 2 Rotary 3 Rotary 4 Rotary 5 EFFECTS SHADOW Set the position of the shadow by operating the joystick while holding down the SHIFT key. The CENTER, SCENE GRABBER, and HOLD buttons flash temporarily. To cancel the shadow position setting, press the key while holding down the SHIFT key in the state where [FEECTS] is selected (inverted to black). At the same time as the setting becomes [OFF], the specified shadow position is reset. If [TRAIL] is selected Rotary 1 Rotary 2 Rotary 3 Rotary 4 Rotary 5 EFFECTS TARIL TIME SELF 16 SELF 1-32 SELF-SPARK BODM BODM-SPARK Select the spark for the trail (the twinkling effect of trails) from [SELF] (original video), [SELF-SPARK] (spark of original video), [BODM] (border color), and [BODMSPARK] (border spark) using the rotary 3 control. When [BODM] or [BODM SPARK] is selected, the color set in the [PATTERN EDGE] submenu of the [TRANSITION] menu is used as the border color. Set the continuation time of the trail in the range of 1 to 32 using the rotary 4 control. To set the offset position of the trail, operate the joystick while holding down the SHIFT key. The CENTER, SCENE GRABBER, and HOLD buttons flash temporarily. The offset position setting can be cancelled in the same way as for canceling the shadow position setting. NOTE The trail or shadow settings are canceled when TRAIL or SHADOW is selected in the [DSK EFFECTS] submenu of the [DSK FADE] menu or when the multi-strobe effect or DECAY is selected in the [VIDEO EFFECTS] menu. 4
-
 1
1 -
 2
2 -
 3
3 -
 4
4 -
 5
5 -
 6
6 -
 7
7 -
 8
8 -
 9
9 -
 10
10 -
11
-
12
-
13
-
14
-
15
-
16
-
17
-
18
-
19
-
20
-
21
-
22
-
23
-
24
-
25
-
26
-
27
-
28
-
29
-
30
-
31
-
32
-
33
-
34
-
35
-
36
-
37
 |
 |
